Tuesday, November 8, 2011

USS Hornet


Figure 1: USS Hornet pursued by HMS Cornwallis, 28 April 1815. Artwork depicting the British 74 gun ship Cornwallis (at left) chasing the US sloop of war Hornet in the South Atlantic, as the latter's crew throws overboard spare spars, guns and other items in an effort to increase her speed. Courtesy of Mr. Beverly R. Robinson, March 1937. US Naval History and Heritage Command Photograph. Click on photograph for larger image.


Figure 2: US Hornet (1805-1829). Rigged model of a brig, made circa 1812. Hornet was converted from brig to ship rig in 1811. Courtesy of the Anderson Galleries, New York. US Naval History and Heritage Command Photograph. Click on photograph for larger image.


Figure 3: Action between USS Hornet and HMS Peacock, 24 February 1813. Artwork depicts Peacock's mainmast collapsing at the close of the engagement. Courtesy of Mr. Beverly R. Robinson, March 1937. US Naval Historical Center Photograph. Click on photograph for larger image.


Figure 4: Captain James Lawrence, USN, Commanding Officer of USS Hornet and USS Chesapeake. Engraving of the medal authorized by the United States Congress in honor of Captain Lawrence's 24 February 1813 victory in the action between USS Hornet and HMS Peacock. The Congress ordered a gold version of the medal and requested that the President present it to his nearest male relative. A silver version was presented to each commissioned officer who served under him in Hornet. The engraving was published in Lossing's "Field Book, War of 1812," page 700. US Naval History and Heritage Command Photograph. Click on photograph for larger image.


Figure 5: Captain James Lawrence, USN (1781-1813). Stipple engraving by David Edwin, after Gilbert Stuart, printed with a line engraving by Francis Kearny depicting HMS Peacock sinking after she was captured by USS Hornet, under Lawrence's command, on 24 February 1813. US Naval History and Heritage Command Photograph. Click on photograph for larger image.


Figure 6: Master Commandant James Lawrence, USN (1781-1813). Oil on wood, 28.5" x 23.5," by Gilbert Stuart (1755-1828), Boston, circa 1812. Painting in the US Naval Academy Museum Collection. Bequest of George M. Moffett, 1952. Official US Navy Photograph, now in the collections of the National Archives. Click on photograph for larger image.


Figure 7: USS Hornet captures HMS Penguin, 23 March 1815. Colored lithograph by S. Walters , after a sketch by William Skiddy, depicting the two sloops close aboard during the engagement, which took place in the south Atlantic off Tristan d'Acunha. Note that the erroneous date of 23 January 1815 appears on the print. Courtesy of the US Naval Academy Museum, Annapolis, Maryland. Beverly R. Robinson Collection. US Naval History and Heritage Command Photograph. Click on photograph for larger image.


Figure 8: USS Hornet in action with HMS Penguin, 23 March 1815. Halftone reproduction of an artwork by Carlton T. Chapman, depicting the capture of HMS Penguin by USS Hornet off Tristan da Cunha, in the south Atlantic. US Naval History and Heritage Command Photograph. Click on photograph for larger image.


Figure 9: Lithograph of USS Hornet by Imbert, published in "The Sailors Magazine" March 1830. It depicts Hornet foundering off Tampico, Mexico, on 29 September 1829. US Naval History and Heritage Command Photograph. Click on photograph for larger image.


Figure 10: USS Hornet (1805-1829), at top, and the schooner USS Grampus (1821-1843). Sketches of hulls and rigging (with the latter out of scale to the hulls), by William A.K. Martin, circa 1843 or later. Both vessels, which were lost at sea with all hands, are depicted flying their National Ensigns upside down, a sign of distress. US Naval History and Heritage Command Photograph. Click on photograph for larger image.


USS Hornet was a 440-ton brig sailing ship that was built by William Price of Baltimore, Maryland, and was commissioned there on 18 October 1805. She was approximately 106 feet long and 31 feet wide and was armed with 2 12-pounder “long guns” and 18 32-pounder carronades. Carronades were short smoothbore cast-iron cannons that were used primarily as short-range weapons. The long guns were positioned forward for use when chasing an enemy.

After being commissioned, Hornet patrolled America’s Atlantic coastline until 29 March 1806, when she was ordered to join a small US Naval squadron that was protecting American shipping in the Mediterranean from pirates. Hornet then returned to the United States and arrived at Charleston, South Carolina, on 29 November 1807 and was soon decommissioned there.

Hornet was re-commissioned on 26 December 1808. She transported General James Wilkinson to New Orleans, patrolled off America’s eastern coastline, and carried dispatches to Holland, France, and England. Hornet then was sent to the Washington Navy Yard in Washington, DC, to be rebuilt and re-rigged as a sloop of war. This conversion took place between November 1810 and September 1811.

At the start of the War of 1812, Hornet was assigned to Commodore John Rodgers’ squadron. She captured the privateer Dolphin on 9 July 1812, but the prize ship Dolphin was recaptured by the British while en route back to the United States. By the middle of 1812, Hornet (now under the command of Master Commandant James Lawrence) had been cruising in the Atlantic for nearly four months, sometimes escorting the big frigate USS Constitution. But by early January 1813, Hornet was on her own and spent most of January blockading the Brazilian port of Bahia. While blockading Bahia, Hornet managed to keep the British sloop of war Bonne Citoyenne in port while also capturing several British merchant ships that were sailing nearby.

Then on 24 February 1813, while still sailing off the northern coast of South America, Hornet sighted the slightly smaller brig-rigged sloop of war HMS Peacock. Both ships probably saw each other at approximately the same time and closed for battle. At 1620, Peacock hoisted her colors and so did Hornet. By 1725, both ships were within range to exchange broadsides. Peacock, under the command of Captain William Peake, tried her best, but Hornet was more maneuverable and her gunnery was much more accurate than Peacock’s. Hornet’s guns swept Peacock’s decks and were rapidly blowing the ship to pieces. Within fifteen minutes, after having lost her commanding officer and seven other men killed or mortally wounded, Peacock gave up. The British ship had six feet of water in her hold and was cut to pieces in both her hull and masts. Some British sailors hoisted the Union Jack from her mainmast upside down, a signal of distress. But shortly after that, Peacock’s mainmast collapsed and fell overboard. Both Hornet and Peacock anchored after that and every attempt was made to save the British ship, but HMS Peacock sank soon after the end of the short confrontation. Hornet, which had lost only one man during the battle, took aboard Peacock’s survivors and then went about repairing her own damages. Because of the British survivors, Hornet was now badly overcrowded, so she sailed back to the United States and arrived at Martha’s Vineyard, Massachusetts, on 19 March 1813.

Upon her return to the United States, Hornet’s commander, Master Commandant James Lawrence, was promoted to full captain and the US Congress authorized that a medal be made in honor of Captain Lawrence’s victory over HMS Peacock. Two months after the battle, Captain Lawrence took command of the frigate USS Chesapeake, which was preparing to go to sea at Boston, Massachusetts. Chesapeake left port on 1 June 1813 and immediately engaged the Royal Navy frigate HMS Shannon in a fierce battle. Unfortunately, Captain Lawrence was mortally wounded by small arms fire and, as he was being taken below to the doctor, he uttered the famous words: “Don’t give up the ship.” Chesapeake was soon overwhelmed by British boarders and the ship had to give up. Captain James Lawrence died of his wounds on 4 June, while Chesapeake was being taken to Halifax, Nova Scotia, by her captors. His body was later repatriated to New York for burial. However, Congress still ordered that a gold version of Lawrence’s medal commemorating his victory over HMS Peacock be struck and requested that the president of the United States present it to his nearest male relative. A silver version of the medal was also presented to each commissioned officer who served under Lawrence on board Hornet.

Although the United States Congress ratified the Treaty of Ghent on 18 February 1815, thereby ending the War of 1812 with England, this news took a long time to reach ships at sea. So during the late morning of 23 March 1815, when Hornet (now under the command of Master Commandant James Biddle) sighted the British brig-sloop HMS Penguin off Tristan d’Acunha island in the south Atlantic, neither ship was aware that they were at peace.

The two sloops approached each other on roughly parallel courses, with Penguin to windward. Hornet and Penguin opened fire on each other at roughly 1340, exchanging broadsides, with Hornet firing to starboard and Penguin to port. After fifteen minutes, Hornet let loose a devastating broadside that killed Penguin’s commanding officer and many of her crewmen. Penguin’s bowsprit then caught in Hornet’s rigging and, as the two ships separated, the British ship’s bowsprit broke away, taking her foremast with it. Penguin was totally disabled and what was left of her crew surrendered to Hornet shortly after 1400. After the battle ended, the US schooner Tom Bowline and the US sloop of war Peacock arrived on the scene as Penguin began to sink. After Penguin sank, her surviving crewmembers were sent to Rio de Janeiro aboard Tom Bowline while Hornet and Peacock remained in the area for about three more weeks.

Hornet and Peacock then headed for the East Indies, still unaware that the war had already ended. On 27 April 1815, while sailing to the East Indies, both ships sighted HMS Cornwallis, a 74-gun ship-of-the-line. The two American ships mistook Cornwallis for a merchant ship and decided to attack. But after discovering their error, both ships retreated. However, Cornwallis saw the American ships and decided to give chase to Hornet. Hornet tried her best to get away from the giant British warship, but Cornwallis was beginning to gain on it. So Hornet’s skipper, James Biddle, gave the order to throw almost everything overboard to lighten the ship to gain more speed. Soon spare spars, boats, nearly all of her guns and ammunition, anchors, cables, some ballast, and a lot of other equipment went over the side. Through Biddle’s skillful seamanship and Cornwallis’ poor gunnery, Hornet picked up speed and got away. Now defenseless, Hornet returned to the United States and arrived at New York City on 9 June 1815.

After the war, Hornet went on a cruise to the West Indies and then was sent to Copenhagen, Denmark, in 1818. After making another trip to the Mediterranean in 1819, Hornet returned to the United States. She was based at Key West and Pensacola, Florida, to assist in ending piracy in the Caribbean Sea. Hornet captured the pirate schooner Moscow on 29 October 1821 off the coast of Santo Domingo and continued patrolling the Caribbean for several more years.

Hornet left her base at Pensacola on 4 March 1829 and set course for the coast of Mexico. She was never heard from again. On 27 October 1829, the commander of the US Navy’s West Indies Squadron received information that USS Hornet had been dismasted in a gale off Tampico, Mexico, on 29 September 1829 and had foundered with the loss of all hands. It was a sad end to one of the finest ships in America’s young Navy.

Tuesday, November 1, 2011

USRC Hudson


Figure 1: USRC Hudson at the Norfolk Navy Yard, Portsmouth, Virginia, 21 April 1898. Courtesy of the US Coast Guard History website. Click on photograph for larger image.


Figure 2: USRC Hudson at the Norfolk Navy Yard, Portsmouth, Virginia, 21 April 1898. Courtesy of the US Coast Guard History website. Click on photograph for larger image.


Figure 3: USRC Hudson at the Norfolk Navy Yard, Portsmouth, Virginia, 21 April 1898. Photograph from the Bureau of Ships Collection in the US National Archives. Click on photograph for larger image.


Figure 4: USS Winslow (TB-5) photographed circa 1898, with a small "water taxi" rowing past her bow. Courtesy of Jack Howland, 1985. US Naval Historical Center Photograph. Click on photograph for larger image.


Figure 5: USS Winslow (TB-5) off Philadelphia, Pennsylvania, in 1898. The Neafie & Levy shipyard is in the background. The original photograph was copyrighted by William H. Rau, 1898. US Naval Historical Center Photograph. Click on photograph for larger image.


Figure 6: USRC Hudson coming to the rescue of USS Winslow during the Battle of Cardenas, Cuba, during the Spanish-American war, 11 May 1898. Courtesy USCG Historian’s website: http://www.76fsa.org/cgta/usrc_hudson_-_battle_of.htm Click on photograph for larger image.


Named after William L. Hudson (1794-1862), a noted US Navy Captain, the 128-ton United States Revenue Cutter (USRC) Hudson was built by John H. Dialogue at Camden, New Jersey, and was commissioned into the Revenue Cutter Service (which was the forerunner of the US Coast Guard) 17 August 1893. Hudson was approximately 94 feet long and 20 feet wide, had a top speed of 12 knots, and had a crew of 11 officers and men. Hudson also was the Revenue Service’s first vessel to have a steel hull and a triple-expansion steam engine. The small ship was armed with two 6-pounder Driggs-Schroeder rapid fire guns and one Model 1895 Colt automatic machine gun.

For most of her career, Hudson was assigned to duties in the New York Harbor area. Since she was a Revenue Cutter, the ship was under the control of the Treasury Department. But with the coming of the Spanish-American War, Hudson was transferred to the US Navy on 24 March 1898 and commissioned as USS Hudson, with First Lieutenant Frank Hamilton Newcomb of the Revenue Cutter Service in command.

Hudson left New York on 24 April 1898, shortly after war was declared with Spain. She steamed south to Key West, Florida, and was assigned to patrol duties as soon as she arrived. Hudson then was used as a dispatch carrier and ordered to join the other US Navy ships that were blockading Cuba. On the morning of 11 May 1898, the gunboats Machias, Wilmington, as well as Hudson, were ordered to blockade the harbor at Cardenas on the north coast of Cuba. These ships were joined by the torpedo boat USS Winslow, under the command of Lieutenant J. B. Bernadou. After three Spanish gunboats were seen in the harbor, the small American task force decided to run in after them. Winslow went in first to reconnoiter the area closest to shore, with the two larger gunboats ready to provide gunfire support as soon as anything was spotted.

At this point, Hudson was sent to scout the western shore of the bay while Winslow was investigating the east side of the harbor. When Winslow was roughly 1,500 yards from Cardenas, numerous shore guns opened fire on the torpedo boat. Shells were exploding all around Winslow, when, suddenly, some of them started to hit their target. Within a few minutes several more shells slammed into the torpedo boat, killing and wounding some men, and disabling the ship. Winslow now was dead in the water and drifting towards shore.

As soon as First Lieutenant Frank H. Newcomb, commander of Hudson, saw what was happening to Winslow, he immediately steered his ship into the enemy fire to assist the torpedo boat. Hudson’s six-pounders sent a steady stream of fire at the Spanish artillery emplacements on shore. At the same time, the gunboat Wilmington kept firing everything she had against the town of Cardenas, destroying storehouses along the shore as well as all three of those Spanish gunboats that were originally in port. Because of the fire coming from both Hudson and Wilmington, the shots coming from the Spanish artillery began to subside. This allowed Hudson to gradually come near Winslow and try to rig a tow line. But as the Revenue Cutter neared the torpedo boat another Spanish artillery shell hit Winslow, killing Ensign Worth Bagley and wounding several men. Yet despite the Spanish shells that were now hitting the revenue cutter, Hudson got closer to Winslow and, after two tries, managed to secure a tow line.

By now Winslow was in terrible shape and near sinking. Unfortunately, Winslow’s rudder was jammed due to a direct hit on her stern and this made towing impossible. So, as a last resort, First Lieutenant Newcomb ordered that both ships be lashed together. Even though Spanish shells were still hitting both Winslow and Hudson, the Revenue Cutter managed to pull Winslow away from shore and limp slowly out of the harbor area. Hudson’s two six-pounders kept up a steady stream of protective fire, shooting 120 rounds in less than 30 minutes. But even though progress was unbearably slow, Hudson managed to keep Winslow afloat and pull her to safety.

As soon as Winslow was out of range and out of danger from further damage, Lieutenant Bernadou on board Wilson signaled to Wilmington, “Many killed and wounded—send boat!” Eventually, Hudson brought Winslow alongside Wilmington and all of Winslow’s dead and wounded were transferred to the larger gunboat. Of the Winslow’s crew of 21, five were killed and five were wounded (including Bernadou, who was hit by some shrapnel from an exploding Spanish shell that ripped into his right thigh; he used a towel as a tourniquet so that he could stay in command of his ship during the battle). Once the wounded were treated on board Wilmington, they (along with the dead) were again transferred, this time to Hudson, which was heading back to Key West along with some dispatches regarding the battle.

While this whole battle was going on, the other American gunboat during this operation, Machias, was also very active. Machias was bombarding Spanish positions on the smaller islands within Cardenas Harbor known as “The Keys.” Machias opened fire on the Spanish signal station on Diana Key, destroying it. After it was destroyed, Machias sent a landing party to take over Diana Key and to make sure there were no wires on the island that were attached to mines in the bay. After the landing party arrived on Diana Key, the American flag was hoisted next to the burning Spanish signal station and the men also discovered that there were no wires leading to mines in the bay.

As soon as Hudson returned to Key West, the wounded and the dead were taken off the ship. First Lieutenant Newcomb was interviewed after the battle and stated, “I know we destroyed a large part of the town near the wharves and burned their gunboats. But we were in a vortex of shot, shell and smoke, and could not accurately tell how much damage we did to the city.” Evidently the American ships did a lot of damage to Cardenas, because it was never a problem for the United States for the rest of the war. For their bravery during the Battle of Cardenas, First Lieutenant Frank H. Newcomb received a gold Congressional medal, the other officers on board Hudson received silver medals, and the crew received bronze medals. These were unique awards made specifically to commemorate the battle itself and were the only specially struck medals awarded for bravery during the war. President William McKinley noted in his request to Congress for the special medals that: “In the face of a most galling fire from the enemy’s guns, the revenue cutter Hudson, commanded by First Lieutenant Frank H. Newcomb, United States Revenue Cutter Service, rescued the disabled Winslow, her wounded commander and remaining crew. The commander of the Hudson kept his vessel in the very hottest fire of the action, although in constant danger of going ashore on account of the shallow water, until he finally got a line fast to the Winslow and towed that vessel out of range of the enemy’s guns, a deed of special gallantry.”

Hudson remained on blockade duty for several weeks after the attack on Cardenas, mostly to deliver dispatches for the fleet, though she did capture two small fishing sloops that were attempting to run the blockade off Havana, Cuba. She then returned to Key West and steamed to Norfolk, Virginia, arriving there on 21 August 1898. The ship was then returned to the Revenue Service and became, once again, USRC Hudson.

Once back with the Revenue Service, Hudson was again based in the New York Harbor area. She resumed her traditional duties as a Revenue Cutter, which was generally patrol, search and rescue, and stopping any smuggled goods or contraband from entering the country. On 28 January 1915, the Life-Saving Service and the Revenue Cutter Service were combined to create the US Coast Guard. Hudson became the US Coast Guard Cutter (USCGC) Hudson and remained with the Coast Guard until 6 April 1917, when she was once again transferred into the Navy for use during World War I. Hudson was mainly given patrol and escort duties during the war, but was returned to the Coast Guard on 28 August 1919. Hudson remained active in the Coast Guard until 3 May 1935, when she was decommissioned and sold after giving more than 40 years of service. USCGC Hudson proved that you don’t have to be big or powerful to make a difference in a battle and both Winslow and her crew owed much to this little ship.

Tuesday, October 25, 2011

USS Barton (DD-599)


Figure 1: USS Barton (DD-599) in Boston Harbor, Boston, Massachusetts, 29 May 1942, the day she was commissioned. Official US Navy Photograph, from the collections of the Naval Historical Center. Click on photograph for larger image.


Figure 2: USS Barton (DD-599) in Boston Harbor, Boston, Massachusetts, on the day she was commissioned, 29 May 1942. Official US Navy Photograph, from the collections of the Naval Historical Center. Click on photograph for larger image.


Figure 3: USS Barton (DD-599), date and place unknown. US Navy Photograph. Click on photograph for larger image.


Named after John Kennedy Barton (1853-1921), a former Chief of the US Navy’s Bureau of Steam Engineering, USS Barton was a 1,620-ton Benson class destroyer that was built by the Bethlehem Steel Company at Quincy, Massachusetts, and was commissioned on 29 May 1942. The ship was approximately 348 feet long and 36 feet wide, had a top speed of 37 knots, and had a crew of 208 officers and men. Barton was armed with four 5-inch guns, four 40-mm guns, seven 20-mm guns, 10 21-inch torpedo tubes, and depth charges.

Following a brief shakedown cruise off the coast of Maine, Barton began escorting various ships off the New England coastline starting in July 1942. She was ordered to the Pacific on 23 August and, after transiting the Panama Canal at the end of August, Barton joined Task Group (TG) 2.12 at the Tonga Islands, arriving at Tongatabu on 12 September. Shortly after that, Barton sailed to Noumea, New Caledonia.

At this time, the battle for Guadalcanal was being fought in earnest. On 2 October 1942, Barton joined Task Force 17 which was leaving Noumea and headed for the Shortland Islands, where Japanese forces were rumored to be gathering for an attack on Guadalcanal. Task Force 17 was built around the carrier USS Hornet (CV-8), along with two heavy cruisers, two light cruisers, and four other destroyers. By 5 October, Hornet’s planes reached the Shortland Islands and, although plagued by bad weather, damaged two Japanese destroyers and sank one transport. But the bulk of the Japanese fleet was not there.

By now, the Japanese were desperate to destroy the one major airstrip held by the Americans on Guadalcanal, called Henderson Field. Whoever controlled the airstrip controlled the skies and the shipping around Guadalcanal, which made the airfield such an important target. The Japanese began daily air raids against the airfield and mounted nightly bombardments by surface warships as well. The Japanese then sent a major task force to engage the American Navy off Guadalcanal and the two forces met on 26 October 1942 in the Battle of the Santa Cruz Islands. Barton was still escorting Hornet, which was also joined by the carrier USS Enterprise (CV-6). During the massive battle that followed, Barton provided anti-aircraft cover for Hornet but the carrier was hit repeatedly by Japanese aircraft and began to sink. Barton rescued 250 of Hornet’s crew before the carrier went down. Although the battle was basically a draw (with two Japanese carriers severely damaged for the loss of Hornet), this was only the beginning of Japan’s naval assault on Guadalcanal.

After making a daring rescue of 17 American crewmen and passengers that were on board a C-47 aircraft that crashed on a reef near Guadalcanal, Barton returned to Noumea and was assigned to Rear Admiral Richmond K. Turner’s Task Force 67. The task force rendezvoused with Rear Admiral Daniel J. Callaghan’s Task Force 67.4 just east of Guadalcanal (near San Cristobal Island) on the morning of 11 November 1942. The two admirals received intelligence reports that a major Japanese naval task force was headed for Guadalcanal. At the same time, a large number of American troop and cargo ships were going to be unloading their badly needed cargo onto the beaches of Guadalcanal. The American warships had to protect the cargo ships from the oncoming Japanese task force.

By 0718 on the morning of 12 November 1942, the cruiser USS Helena (CL-50) and the destroyer Shaw (DD-373) joined Barton in firing on Japanese batteries on land that were firing on the American transports. The counter-battery fire coming from the American warships was extremely accurate and silenced the Japanese guns. This allowed the American transports to continue unloading their troops and cargo without interruption. During the daylight hours, Japanese aircraft tried to attack the cargo ships, but accurate anti-aircraft fire destroyed many enemy warplanes without the loss of any cargo ships.

Then came nighttime. Knowing that the Japanese were approaching, Rear Admiral Turner moved the transports away from the beach and ordered Rear Admiral Callaghan to meet the oncoming Japanese warships. Rear Admiral Turner concluded that this was the only way to stop the Japanese. Even if Callaghan’s force was annihilated, the attack would prevent the Japanese from bombarding Henderson Field and it would inflict so much damage on the enemy that it would allow Turner to continue unloading his merchant ships onto Guadalcanal.

At 1815 on the evening of 12 November, Rear Admiral Turner’s troop transports and cargo ships steamed eastward, away from Guadalcanal. At the same time, Rear Admiral Callaghan’s task force headed north to intercept the Japanese. The ships were deployed in a single column, with four destroyers leading five cruisers followed by another four destroyers, with Barton being among those last four ships. At 0124 on the morning of 13 November 1942, American radar on board the lead ships located the enemy. It was a Japanese task force under the command of Rear Admiral Hiroaki Abe and it consisted of two battleships, one light cruiser, and 14 destroyers.

When the two columns of warships finally slammed into each other, a melee ensued. Some of the ships were only 1,000 yards from each other when the firing began. As the battle continued, the ships from both sides got mixed up, making shooting even more difficult. Barton opened fire with her forward 5-inch guns as soon as she saw the enemy searchlights illuminating the American ships ahead of her. Barton’s forward guns were aimed to port and fired roughly 60 rounds, while her two aft guns fired about 10 rounds each. Barton then altered course to port, moving closer to the enemy column of warships, and launched five torpedoes at the Japanese. Barton’s guns fired for about seven more minutes before the ship had to stop to avoid colliding with the ship in front of it, possibly the destroyer USS Aaron Ward (DD-433). But in stopping, Barton became a perfect target for the Japanese destroyers. After a few seconds, the Japanese destroyer Amatsukaze, which was only 3,000 yards away, fired a torpedo that hit the forward part of Barton. A few seconds later, a second torpedo hit Barton in her forward engine room. There were two tremendous explosions from these torpedo hits that literally broke the ship in half. USS Fletcher (DD-445) which was bringing up the rear of the American column, saw Barton explode at 0156. Lookouts on board Fletcher later stated that Barton “simply disappeared in fragments.”

Ironically, the flames from what was left of Barton and her burning fuel oil illuminated the area, enabling Fletcher’s lookouts to see the wake of a torpedo that was headed straight for her. Fletcher altered course to avoid the torpedo, but in doing so the destroyer moved straight through a group of Barton’s survivors that were struggling in the water. Only 42 of Barton’s crew were later rescued by the cruiser USS Portland (CA-33), as well as by some landing craft from Guadalcanal.

Among the dead was the ship’s commanding officer, Lieutenant Commander Douglas H. Fox. As a tribute to this fine officer, a destroyer, USS Douglas H. Fox (DD-772), was named after him. But the enormous sacrifice made by the US Navy that night in terms of men and warships was not in vain. The Japanese task force not only suffered huge losses, but it was prevented from bombarding and destroying Henderson Field. It was a major victory against terrible odds and it enabled the Marines to hold onto Guadalcanal.

As for Barton, she earned four battle stars for the roughly six months she was in service. In 1992, an expedition that was examining the wrecks off Guadalcanal located part of Barton. She lies in more than 2,000 feet of water southeast of Savo Island. All that was found was the first 100 feet or so of her bow, resting on its port side with both forward five-inch guns still facing port. The ship’s stern section should be nearby, but was never found.

Tuesday, October 18, 2011

USS Philadelphia (CL-41)


Figure 1: USS Philadelphia (CL-41) off the Philadelphia Navy Yard, Pennsylvania, on 22 October 1937. Official US Navy Photograph, from the collections of the Naval Historical Center. Click on photograph for larger image.


Figure 2: USS Philadelphia (CL-41) anchored in the Hudson River, off New York City, 1939. Donation of Lieutenant Gustave J. Freret, USN (Retired), 1972. US Naval Historical Center Photograph. Click on photograph for larger image.


Figure 3: USS Philadelphia (CL-41) at Halifax, Nova Scotia, on 9 April 1942. USS Munargo (AP-20) is in the upper left background. Courtesy of Charles N. Dragonette, 1979. US Naval Historical Center Photograph. Click on photograph for larger image.


Figure 4: Curtiss SOC Seagull scout-observation aircraft is hoisted on board USS Philadelphia (CL-41), during the North African operation, November 1942. Note crewmen holding lines to steady the plane as the aircraft crane swings it inboard. Photographed by Lieutenant Horace Bristol, USNR. Official US Navy Photograph, now in the collections of the National Archives. Click on photograph for larger image.


Figure 5: USS Philadelphia (CL-41) in New York Harbor, 26 April 1943. A Liberty Ship is in the background, with a crated deck cargo. Official US Navy Photograph, now in the collections of the National Archives. Click on photograph for larger image.


Figure 6: USS Philadelphia (CL-41) off New York City, 26 April 1943. Official US Navy Photograph, now in the collections of the National Archives. Click on photograph for larger image.


Figure 7: USS Philadelphia (CL-41) off the New York Navy Yard, 26 April 1943. Photograph from the Bureau of Ships Collection in the US National Archives. Click on photograph for larger image.


Figure 8: Salerno Operation, September 1943. A US Navy destroyer lays a smoke screen during a "Red Alert" for air attack off the Salerno invasion beaches in September 1943. Photographed from the port bridge wing of USS Philadelphia (CL-41). Note manned and ready 20-mm and 40-mm guns on Philadelphia and elevated fire control radar antenna and 5-inch guns on the destroyer. Official US Navy Photograph, now in the collections of the National Archives. Click on photograph for larger image.


Figure 9: Salerno Operation, September 1943. USS Philadelphia (CL-41) and a motor minesweeper (YMS) making a smoke screen to cover the landing area from German air attack, circa 9 September 1943. Photograph from the Army Signal Corps Collection in the US National Archives. Click on photograph for larger image.


Figure 10: Roman Catholic church services on board USS Philadelphia’s after deck, while she was at Algiers, Algeria, circa 1944. Note the use of the US ensign and signal flags as a backdrop, and the cruiser's aircraft catapults flanking the ceremonies. Official US Navy Photograph, now in the collections of the National Archives. Click on photograph for larger image.


Figure 11: Undated starboard side photograph of the Brazilian Navy’s Barroso (C11), formerly USS Philadelphia. Courtesy Robert Hurst. Click on photograph for larger image.


Figure 12: Undated photograph of the Brazilian Navy’s Barroso (C11), formerly USS Philadelphia, in Guanabara bay, Rio de Janeiro, Brazil. Courtesy Artemio Bueno Rosa, Jr. Click on photograph for larger image.


Named after the city in Pennsylvania, USS Philadelphia (CL-41) was a 9,700-ton Brooklyn class light cruiser built by the Philadelphia Navy Yard at Philadelphia, Pennsylvania, and commissioned on 23 September 1937. The ship was approximately 608 feet long and 61 feet wide, had a top speed of 32 knots, and had a crew of 868 officers and men. Philadelphia was armed with 15 6-inch guns, eight 5-inch guns, 20 40-mm guns, and 10 20-mm guns, and carried four scout planes.

After being commissioned, Philadelphia spent most of her time on patrol in the Atlantic area. On 30 April 1938, Philadelphia arrived at Charleston, South Carolina, and hosted President Franklin Roosevelt during the first week of May for a cruise in Caribbean waters. The president returned to Charleston on 8 May. The ship then resumed operations off the Atlantic coast until mid-1939, when she left for the Pacific. After transiting the Panama Canal, Philadelphia was based at San Pedro, California, and then at Pearl Harbor, Hawaii. While at Pearl Harbor, the ship participated in fleet maneuvers until May 1941. Philadelphia left Pearl Harbor on 22 May 1941 and returned to the Atlantic via the Panama Canal. The cruiser arrived at Boston, Massachusetts, on 18 June.

Once Philadelphia arrived at Boston, she was assigned to participate in “Neutrality Patrols,” which were created on 4 September 1939 as a response to the war in Europe. Neutrality Patrols were ordered to track and report the movements of any warlike operations of belligerents in the waters of the western hemisphere. As part of the patrols, Philadelphia steamed as far south as Bermuda and as far north as Halifax, Nova Scotia. The ship entered the Boston Navy Yard on 25 November 1941 for an overhaul and was there when the Japanese attacked Pearl Harbor on 7 December.

After her overhaul was completed on 18 December 1942, Philadelphia resumed patrol and escort duties off the coast of the United States. Philadelphia escorted two convoys to Scotland during the middle of 1942, but was pulled off escort duty to become the flagship of the Southern Attack Group for the invasion of North Africa. Philadelphia’s task force left Norfolk, Virginia, on 24 October 1942 with 102 ships carrying 35,000 men and their equipment bound for North Africa. The troops were under the command of the famous General George S. Patton and the entire landing force reached Casablanca, Morocco, shortly before midnight on 7 November. The invasion force was split up into three different sections and landed at three different points along the Moroccan coast in the early morning darkness of 8 November.

During the invasion, Philadelphia provided critical and highly accurate gunfire support for the troops landing on shore, knocking out several Vichy French artillery batteries that were firing at the invasion force. Once the landing troops had secured their beachheads, Philadelphia was ordered to leave Morocco for New York City on 13 November and arrived there on 24 November. The ship was based at New York until 11 March 1943, when she escorted two convoys to Casablanca. Philadelphia then moved to Norfolk, Virginia, and began preparing for the next big Allied invasion.

Philadelphia left Norfolk with nine destroyers on 8 June 1943 and arrived at Oran, Algeria, on 22 June. Oran was the final staging area for the invasion of Sicily and on 5 July the entire invasion force left Oran and headed north for the Italian island. The Allies arrived off the beaches of Scoglitti, Sicily, shortly before midnight on 9 July 1943, with Philadelphia once again providing gunfire support for the troops on shore. Philadelphia provided gunfire support for Allied troops until 5 September. While hitting targets all over Sicily, Philadelphia also endured numerous enemy air attacks and shot down a total of six aircraft during these battles.

On 9 September 1943, Philadelphia’s guns were used yet again during the Allied invasion of Salerno in southern Italy. One of the ship’s scout planes spotted 35 German tanks not far from the beach where the Allies were landing and this information was relayed back to the ship. Philadelphia opened fire with her six-inch guns and destroyed seven of the tanks before the rest retreated from the area. The ship was almost hit by a German glide bomb during an aerial attack. The bomb exploded next to the ship, wounding several of her crewmen. But the ship could still remain in action and her guns continued to provide badly needed support for the troops on shore. Philadelphia’s guns shot down another German aircraft on 15 September and two more on 17 September. After providing numerous gunfire support missions along the Italian coast, Philadelphia returned to the United States on 6 November as part of a convoy heading for Norfolk.

Philadelphia left Norfolk on 19 January 1944 and, after making a stop in Oran, Algeria, joined the Allied invasion force off the coast of Anzio, Italy, on 14 February. The ship provided gunfire support for the troops on shore until 23 May. In August 1944, Philadelphia then provided gunfire support for the Allied invasion of southern France. After bombarding German positions along the coast of southern France, the ship returned to Philadelphia on 6 November.

Philadelphia underwent a major overhaul at the Philadelphia Navy Yard and, after a refresher training cruise for her crew, was ready for another assignment on 4 June 1945. Although the war in Europe had ended on 8 May 1945, Philadelphia was still a very active warship and was ordered to escort USS Augusta (CA-31), which was carrying President Harry Truman to and from the Potsdam Conference in Europe. Later that year, Philadelphia transported US military personnel home from Europe as part of Operation “Magic Carpet.”

Philadelphia returned to her namesake city and was placed on the “inactive” list on 9 January 1946. She was decommissioned at the Philadelphia Navy Yard on 3 February 1947 and was struck from the Navy List on 9 January 1951. As a part of a plan to assist countries that were allied to the United States during the Cold War, USS Philadelphia was sold to Brazil in 1951 and reactivated at the Philadelphia Navy Yard. The ship was re-named Barroso (C-11) and served in the Brazilian Navy for more than two decades. Barroso was eventually scrapped in 1973.

Tuesday, October 11, 2011

USS Patterson (DE-1061, FF-1061)


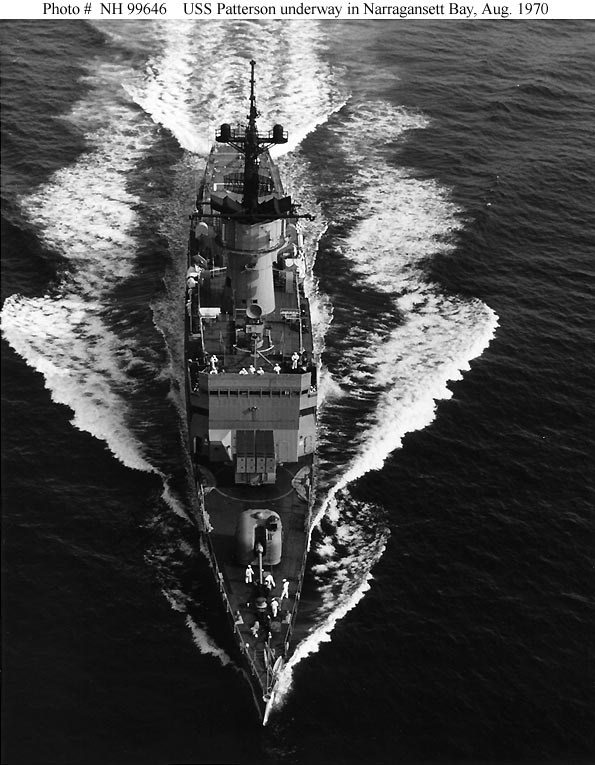
Figure 1: USS Patterson (DE-1061) underway in Narragansett Bay, Rhode Island, 27 August 1970. Photographed by PHCS W.H. Long, USN. Official US Navy Photograph, from the collections of the Naval Historical Center. Click on photograph for larger image.


Figure 2: USS Patterson (DE-1061) underway in Narragansett Bay, Rhode Island, 27 August 1970. Photographed by PHCS W.H. Long, USN. Official US Navy Photograph, from the collections of the Naval Historical Center. Click on photograph for larger image.


Figure 3: USS Patterson (DE-1061) underway, circa the early 1970s. Official US Navy Photograph, from the collections of the Naval Historical Center. Click on photograph for larger image.


Figure 4: USS Patterson (DE-1061) visiting a German port, circa June-July 1971. Courtesy of Donald M. McPherson, 1974. US Naval Historical Center Photograph. Click on photograph for larger image.


Figure 5: USS Patterson (FF-1061) at the Philadelphia Naval Shipyard, 1984, while serving as a unit of the Naval Reserve Force. Photographed by Francis M. Cox. Official US Navy Photograph, from the collections of the Naval Historical Center. Click on photograph for larger image.


Figure 6: A port view of USS Patterson (FF-1061) at sea on 14 September 1990. The date on this, and the next photograph, has to be incorrect. Patterson went through the Knox Class hull upgrade program prior to 1987, per ex-crewmember Brian Wells. US Navy photo DVID #DN-ST-90-11618 by PHCS Long. Click on photograph for larger image.


Figure 7: A port-bow view of USS Patterson (FF-1061) at sea on 14 September 1990. The date on this photograph has to be incorrect. Patterson went through the Knox Class hull upgrade program prior to 1987, per ex-crewmember Brian Wells. US Navy photo DVID #DN-ST-90-11617 by PHCS Long. Click on photograph for larger image.


Named after Commodore Daniel Todd Patterson (1786-1839), a naval hero from the War of 1812, USS Patterson (DE-1061) was a 3,011-ton Knox class destroyer escort that was built by the Avondale Shipyard at Westwego, Louisiana, and was commissioned on 14 March 1970. The ship was approximately 415 feet long and 46 feet wide, had a top speed of 27 knots, and had a crew of 224 officers and men. Patterson was armed with one 5-inch gun, one Mk 16 ASROC missile launcher, four Mk 46 torpedoes, one Mk 25 BPDMS Sea Sparrow missile launcher, and one SH-2 Seasprite (LAMPS I) helicopter.

After being commissioned, Patterson conducted her shakedown cruise off Guantanamo Bay, Cuba. From June to August 1971, the ship made her first overseas deployment to northern Europe. During the first half of 1974, she steamed to the Mediterranean Sea for service with the US Navy’s Sixth Fleet. All newer escort ships were reclassified as frigates in mid-1975, so Patterson was re-designated FF-1061. At this time, the ship was also modified. She received enlarged helicopter facilities and the Basic Point Defense Missile System, which included a launcher installed on her afterdeck for eight Sea Sparrow guided missiles.

Patterson completed a second deployment in the Mediterranean from late 1976 to mid-1977, and a third one from 1978 to early 1979. From September to October 1979, the ship returned to northern European waters and in mid-1980 Patterson provided help to the West Indies island of St. Lucia after it was hit by a massive hurricane. After returning to the Mediterranean in October 1980, Patterson continued eastward and sailed into the Persian Gulf towards the end of the year and during the first month of 1981. Patterson completed a fifth deployment with the Sixth Fleet from late 1981 into 1982, with a trip to the Red Sea at the end of that deployment. The ship earned a Meritorious Unit Commendation for her service during that period.

In June 1983, Patterson was assigned to the US Naval Reserve Force, based at Philadelphia, Pennsylvania. The ship remained in this “non-deploying” status for the next eight years, but was used as a training ship for Naval Reservists. In this capacity, Patterson sailed in the western Atlantic, from Canada to the West Indies. In late 1990, Patterson conducted counter-narcotics operations in the Caribbean, making a round-trip passage through the Panama Canal as part of that mission. On her final cruise, Patterson went to Bermuda in May 1991. The ship was decommissioned on 30 September 1991. USS Patterson was stricken from the Naval Vessel Register of ships on 11 January 1995. Although Patterson was considered for transfer to Greece as a source of spare parts, this never took place and the ship was sold for scrapping on 29 September 1999. Patterson was one of 46 Knox class frigates built in the United States and these ships provided excellent service during the final years of the Cold War, from 1969 to the end of the 1980s.

Tuesday, October 4, 2011

USS Adams (DM-27, MMD-27)


Figure 1: USS Adams (DM-27) off San Francisco, California, 2 May 1945. Courtesy of Donald M. McPherson, 1971. US Naval Historical Center Photograph. Click on photograph for larger image.


Figure 2: USS Adams (DM-27) off the Mare Island Navy Yard, California, in late June 1945, following repair of kamikaze damage. Photograph from the Bureau of Ships Collection in the US National Archives.


Named after Lieutenant Samuel Adams (1912-1942), a US Navy hero of the Battle of Midway, the 3,218-ton USS Adams was an Allen M. Sumner class destroyer that was originally laid down as DD-739 at the Bath Iron Works, Bath, Maine, but was re-designated a destroyer-minelayer, DM-27, on 20 July 1944. The ship was commissioned at Boston, Massachusetts, on 10 October 1944. Adams was approximately 376 feet long and 40 feet wide, had a top speed of 34 knots, and had a crew of 363 officers and men. The destroyer-minelayer was armed with six 5-inch guns, eight 40-mm guns, 12 20-mm guns, depth charges, plus 80 mines.

Adams completed her shakedown cruise on 29 November 1944 and the ship arrived at Norfolk, Virginia, on 3 December. On 11 December, Adams, along with her sister ship USS Shea (DM-30), left Norfolk and headed north to New York, where they rendezvoused with the carrier USS Bennington (CV-20). Together, all three ships left for the Panama Canal on 15 December. They transited the canal on 20 December and two days later headed for the coast of California. The three ships arrived at San Diego, California, on 29 December and stayed there for two days undergoing repairs. On 1 January 1945, the three ships left San Diego and arrived at Pearl Harbor, Hawaii, six days later.

For almost two months, Adams remained based in Hawaii. While there, she acted as plane guard for the escort carrier USS Bataan (CVL-29) while the carrier conducted landing qualifications for pilots. Adams also conducted gunnery and shore bombardment exercises. Early in February, Adams laid mines and tested mine-detection equipment on them. Adams completed all of her exercises by the end of February 1945.

Adams left Pearl Harbor on 2 March 1945 and headed for the western Pacific. She arrived at Ulithi Atoll on 14 March and stayed there for five days. Adams then left Ulithi with the task force that was going to invade Okinawa, just off the Japanese mainland. On 23 March, the day before arriving off the coast of Okinawa, Japanese aircraft attacked the task force. As the guns on board Adams began shooting at the incoming aircraft, a shell fired from an aft 5-inch gun exploded prematurely, killing two crewmen and wounding 13 others. At dawn the next day, Adams began minesweeping operations off Okinawa, and also provided anti-aircraft gunfire support for the task force.

Over the next few days, the Japanese mounted heavy air attacks on the American warships off Okinawa. During that time, Adams was attacked by at least 12 different aircraft. Adams managed to shoot down six of the Japanese planes and claimed two more as “probable kills.” On 28 March, a Japanese aircraft was shot down and crashed roughly 25 feet from the port bow of the ship, showering Adams with debris and burning gasoline. Then on 1 April, while steaming not far from Okinawa, a badly damaged Japanese aircraft crashed close to the stern of the ship. Unfortunately, the plane was carrying two bombs and they both exploded under the fantail of the ship, causing severe damage and jamming the ship’s rudders at hard right. While Adams moved in a constant right-hand circle, two more Japanese kamikaze planes dove at the ship. Adams managed to shoot one down while the other was shot down by a nearby destroyer. Adams had to be towed to Kerama Retto, an island near Okinawa, for temporary repairs.

Adams left Kerama Retto on 7 April 1945 and was sent back to the United States for permanent repairs. After making stops at Guam and Pearl Harbor, Adams arrived at the Mare Island Navy Yard in California on 7 May. Repairs were completed and the ship left for Hawaii on 17 July, arriving at Pearl Harbor several days later. After that, Adams spent the next few days participating in gunnery exercises around Hawaii.

On 4 August 1945, Adams left Pearl Harbor with USS Koiner (DE-331) and again headed for the western Pacific. After a brief stop at Eniwetok Atoll, the two ships, along with the attack transport Sitka (APA-113), arrived at Guam on 15 August, the day hostilities ceased with Japan. The next day, Adams left for Okinawa and arrived there on 18 August. She stayed there until 31 August and the next day left for mainland Japan. Adams arrived off Kagoshima, Kyushu, Japan, on 3 September and began minesweeping a channel into the port. Adams completed that mission on 9 September and then the ship returned to Okinawa. Adams reached Okinawa on 11 September and remained there to avoid a typhoon that was moving through the area.

Adams left Okinawa on 24 September 1945 and returned to mainland Japan. She arrived at Ise Wan, Honshu, Japan, on 26 September and began minesweeping operations in preparations for the landing of US Army occupation troops at Nagoya. Adams remained at Ise Wan until the end of October. On 1 November, Adams steamed to Sasebo, Japan, and arrived there two days later. The ship stayed there through most of November and made preparations for returning back to the United States.

Unfortunately for the crew of Adams, the ship had to make a few stops before returning home. On 25 November, the ship left Sasebo and steamed to Taiwan, where she arrived three days later. Adams then joined Task Group (TG) 70.5 and starting on 4 December had to spend ten days minesweeping the Taiwan Strait. After that, Adams was sent to Shanghai, China, and entered the famous Yangtze River on 21 December. Adams stayed at Shanghai until 3 January 1946, but then headed back to Sasebo, Japan.

Adams continued to be assigned various minesweeping duties until early April 1946 and then was finally allowed to return to the United States. After arriving back home, the ship was assigned to the First Fleet and served in it until being decommissioned in December 1946. Adams was berthed with the San Diego Group, Pacific Reserve Fleet, and in February 1955, while still in reserve, USS Adams was re-designated a fast minelayer (MMD-27). Her name was struck from the Navy list on 1 December 1970 and she was sold for scrapping on 16 December 1971.