Tuesday, March 13, 2012

USS Robert L. Barnes (AK-11, AO-14, AG-27)


Figure 1: S.S. Robert L. Barnes in merchant service circa 1917, before acquisition by the US Navy. Alexander McDougall built her as the prototype "rectangular ship" or "sea-going canal boat," with a plain, low hull and a superstructure that could be removed to pass under canal bridges. This steamer was placed in commission as USS Robert L. Barnes on 19 October 1918. US Naval Historical Center Photograph. Click on photograph for larger image.


Figure 2: USS Robert L. Barnes (AO-14) at Guam, probably in 1932. Note the extensive use of awnings. Collection of Roscoe C. Stevens. US Naval Historical Center Photograph. Click on photograph for larger image.


Figure 3: USS Robert L. Barnes (AO-14) at Guam in the 1920s or 1930s with the usual awnings rigged over her deck. Courtesy of Mr. & Mrs. Berle Spurlock, 2007. US Naval Historical Center Photograph. Click on photograph for larger image.


Figure 4: USS Robert L. Barnes (AO-14) at Guam in the 1920s or 1930s. Note the ship's barge, with sailing gear rigged, in foreground. Courtesy of Donald M. McPherson, 1970. US Naval Historical Center Photograph. Click on photograph for larger image.


Captain Alexander McDougall designed the 5,380-ton civilian steel tanker SS Robert L. Barnes for the Robert Barnes Steam Ship Company. The ship was built in less than four months in 1917 by the McDougall-Duluth Company at Duluth, Minnesota, a company that was little more than a large blacksmith shop. What made SS Robert L. Barnes unique was that it was a prototype for a “rectangular ship,” or “sea-going canal boat.” The ship had a simple, low hull with a “portable” superstructure that could be removed to pass under the bridges of the New York State canals. McDougall had previously invented the unusual “whaleback” freighter, of which more than 40 were built. The whalebacks served as both steamers and barges and were built between 1888 and 1898. Robert L. Barnes had a simple design and was fitted with a steam engine that was built in 1888. This unusual vessel also was built 42 feet short to pass through the Welland Canal on her trip to New York from Duluth. Robert L. Barnes was approximately 258 feet long and 43 feet wide, had a top speed of 8.5 knots, and had a crew of 46 officers and men. Originally designed to carry 3,000 tons of coal, the ship was converted to carry oil soon after construction was completed.

Robert L. Barnes was inspected and taken over by the US Navy on 29 June 1918 and was commissioned as an oiler at New York on 19 October. US Navy inspectors, though, noted that she was probably not “structurally strong enough” for seagoing service with the Naval Overseas Transportation Service (N.O.T.S.). Despite that, Robert L. Barnes was assigned to the Fifth Naval District and left New York on 12 March 1919 for Hampton Roads, Virginia. After making a visit to Guantanamo Bay, Cuba, the ship returned to New York and then steamed to Norfolk, Virginia, on 18 April 1919 to begin an extensive overhaul at the Norfolk Navy Yard. On 4 September 1919, Robert L. Barnes was assigned to the Naval Overseas Transportation Service. After being overhauled and almost re-built, Robert L. Barnes left Norfolk on 21 November 1919 for San Pedro, California, via the Panama Canal.

Robert L. Barnes eventually left California and delivered a shipment of diesel fuel to Pearl Harbor, Hawaii. The ship left Pearl Harbor on 8 April 1920 with a load of fuel oil for the naval station at Guam. Robert L. Barnes arrived at Apra Harbor, Guam, on 27 April and continued serving as an oil storage vessel at Apra Harbor. Robert L. Barnes was assigned to be the “Station Ship” for Guam, but was designated a cargo ship (AK-11). In July 1921, she was re-designated more accurately as an oil depot ship and her designation was changed to that of an oiler (AO-14). Robert L. Barnes remained at Guam during most of the years leading up to World War II, except for a few years (1920, 1921, 1922, 1923, 1930, and 1934) when she was towed to the Cavite Naval Yard in the Philippines for overhauls. Her designation was changed once again to miscellaneous auxiliary (AG-27) in July 1938. While at Guam, Robert L. Barnes assisted in the salvage of the grounded US Army transport U.S. Grant in May 1939.

Robert L. Barnes was floating peacefully at anchor at Guam when war broke out in the Pacific on 7 December 1941. The next day, Japanese aircraft attacked the island, bombing and strafing the old oiler. Although the Japanese didn’t score any direct hits, the ship sustained much damage topside and was leaking badly. But the ship was still afloat when the Japanese invaded the island and Robert L. Barnes was captured by the enemy on 10 December 1941, after she was abandoned by her crew. The Japanese repaired the ship and used her as an oiler. The ship somehow managed to survive the war, even though she was officially struck from the Navy List on 24 July 1942. Robert L. Barnes was sold to British mercantile interests and served as SS Fortune and M.T.S. No. 2 from 1945 to 1949. The ship then was scrapped in 1950. Not a bad career for a former “sea-going canal boat” that originally was built to simply navigate the canals of New York State.

Tuesday, March 6, 2012

Bonhomme Richard


Figure 1: Painting of the Bonhomme Richard by artist Geoff Hunt. The painting depicts Bonhomme Richard, commanded by Continental Navy Captain John Paul Jones, probably just before her famous duel with the British warship HMS Serapis, commanded by Royal Navy Captain Richard Pearson, off Flamborough Head, England, on 23 September 1779. Click on photograph for larger image. You can see other works of art by Geoff Hunt here: http://www.brooksartprints.com/Huntlist.html


Figure 2: Model of Bonhomme Richard by Alain Benoit. Click on photograph for larger image. You can find out more about this model and Mr. Benoit’s work at this web site: http://www.shipmodel.com/models/bonhomme-richard-full-hu


Figure 3: Battle between Continental ship Bonhomme Richard and HMS Serapis, 23 September 1779. Oil on canvas, 21" x 28," by Thomas Mitchell (1735-1790), signed and dated by the artist, 1780. It depicts Bonhomme Richard (center), commanded by Continental Navy Captain John Paul Jones, closely engaged with HMS Serapis, commanded by Royal Navy Captain Richard Pearson, off Flamborough Head, England. Firing at right is the Continental frigate Alliance, while at left the British Countess of Scarborough is engaging the American Pallas.The original painting is in the US Naval Academy Museum, Annapolis, Maryland. It was donated by the US Naval Institute in 1949. Official US Navy Photograph, now in the collections of the National Archives. Click on photograph for larger image.


Figure 4: Bonhomme Richard and HMS Serapis by William Gilkerson. The two ships are nearing each other for the final fight. Courtesy of the Beverley R. Robinson Collection, US Naval Academy Museum. Click on photograph for larger image.


Figure 5: “He slowly drove his jibboom into Serapis’ mainmast” by William Gilkerson. About a half hour into the battle, Serapis tried to cross the bow of Bonhomme Richard, but, blanketed by the American’s sails, Serapis lost way. Jones, seeing an opportunity to board, placed his ship’s bow into the British ship’s side. The boarding party was beaten back, and the ships separated. Courtesy of the Beverley R. Robinson Collection, US Naval Academy Museum. Click on photograph for larger image.


Figure 6: "The Ordeal Of John Paul Jones Crew Of The Bonhomme Richard Repelling Boarders From HMS Serapis, September 23, 1779," by Anton Otto Fischer (1882 - 1962). With Bonhomme Richard and Serapis now locked in a death struggle, John Paul Jones’ crew tries desperately to fight off the British crew from Serapis. Click on photograph for larger image. For more examples of Fischer’s extraordinary artwork, go to this web site: http://www.americanartarchives.com/fischer.htm


Figure 7: John Paul Jones bids goodbye to his victorious ship, Bonhomme Richard. Painting by Percy Moran. Click on photograph for larger image.


Figure 8: Captain John Paul Jones, Continental Navy (1747-1792). Portrait by Cecilia Beaux (1855-1942),1906. The original painting is in the US Naval Academy Museum, Annapolis, Maryland. Many biographies have been written about this great man, but the best one still seems to be Samuel Eliot Morison’s John Paul Jones, published by Little, Brown, and Company, 1959. US Naval History and Heritage Command Photograph. Click on photograph for larger image.


The 998-ton Bonhomme Richard was originally built as a merchant ship in 1766 under the name Duc de Duras for the French East India Company. She was purchased by King Louis XVI in early 1779 and placed at the disposal of Captain John Paul Jones of the Continental Navy for operations against the British. Louis XVI, along with France’s Minister of Marine, Monsieur Gabriel de Sartine, gave Jones authority to “use his own judgment” in determining when and where he would sail and what he would then attempt to do. As soon as Jones received the ship, he renamed it Bonhomme Richard in honor of Benjamin Franklin, then the American Commissioner to Paris and author of Poor Richard’s Almanac. The almanac was published in France under the title Les Maximes du Bonhomme Richard.

Bohomme Richard was a sturdy ship but slow, a defect that would haunt her in the coming days. The ship was approximately 152 feet long and 40 feet wide and had a crew of 322 officers and men. Bonhomme Richard was armed with six 18-pounder, 28 12-pounder, and eight 9-pounder cannons. After receiving his ship, Jones spent the next few months selecting his officers, recruiting a crew, and transforming Bonhomme Richard into a frigate. Jones also now bore the honorary title of commodore since several warships had been placed under his overall command. Bonhomme Richard, along with the other ships in Jones’ command, left L’Orient, France, on 19 June 1779 and their first mission was to escort a convoy of transports and merchantmen to various ports along the coast of the Bay of Biscay. The new American frigate Alliance and three French warships, the frigate Pallas, the brig Vengeance, and a cutter taken from the British named Le Cerf, were all part of the squadron under the command of John Paul Jones sailing on board his flagship Bonhomme Richard.

Soon after Bonhomme Richard left L’Orient, a major storm developed. The ships had to battle heavy seas that night and Bonhomme Richard and Alliance collided in the dark. Although both ships sustained substantial damage, each was able to continue with their mission. As the ships proceeded to their destinations, British warships approached the French and American squadron. However, upon seeing the strength of Jones’ force, the British backed off and left the area. Unfortunately, Jones now realized just how slow Bonhomme Richard was because it could not chase any of the faster British warships. After delivering all of the French merchant ships safely to their destinations, Jones and his ships returned to L’Orient on 1 July 1779.

Both Bonhomme Richard and Alliance needed to be repaired. Bonhomme Richard needed a new bowsprit and Alliance needed her mizzenmast repaired. By the end of July 1779, both the American and the French ships were ready for sea again. At this point, the size of the squadron actually grew. Bonhomme Richard sailed with Pallas, Vengeance, and Le Cerf to the waters off the Ile de Groix, where Alliance waited with the French privateers Monsieur and Granville. Shortly after 14 August 1779, the seven warships left the Ile de Groix and sailed northwest toward the southwestern coast of Ireland. Four days later, Monsieur captured a ship and she left the squadron and headed back to France with her prize.

On 20 August 1779, Bonhomme Richard captured the merchant ship Mayflower and Jones sent the brigantine back to L’Orient with a prize crew. On the afternoon of 23 August, Jones and his squadron captured the brig Fortune which was bound for Bristol, England, and sent her back to France as well. But on that same day, Jones had a major problem with the captain of one of the ships in his squadron, the frigate Alliance. Pierre Landais, captain of the Alliance, was a former officer in the French Navy who had gone to America under the sponsorship of Silas Deane, an American diplomat in France. Landais received a captain’s commission in the Continental Navy from Congress’ Marine Committee, which generally approved commissions through connections and political influence rather than ability. On that day, Landais requested to pursue a ship that had been sighted in shoal water near the coast of Ireland. But Jones thought the move too dangerous and risked exposing Alliance in shallow waters that were patrolled by enemy warships. As a result of this decision, Laindais, on the afternoon of 24 August, visited Bonhomme Richard and insultingly berated Jones while announcing that he would obey no future orders from the commodore. Instead, he would follow his own judgment in all matters.

Needless to say, this outburst didn’t sit well with Jones. Unfortunately, France was an ally and Jones’ rank of commodore was a symbolic one. He really only commanded Bonhomme Richard. As a result of the fight between Landais and Jones, several of the ships in Jones’ squadron left. Granville, the other French privateer, left to take a prize and never returned. Pallas, the French frigate, broke her tiller at night and dropped out of sight. Landais took Alliance off in pursuit of prizes on his own and he didn’t return until the end of August. Worse, word had spread of French and American warships in the area, so the British Admiralty sent its own ships to seek them out. Jones’ squadron of seven ships was now reduced to the Bonhomme Richard and Vengeance.

Bonhomme Richard and Vengeance continued to sail in a northerly direction west of the New Hebrides and then headed for Cape Wrath, the northwestern tip of Scotland. On the afternoon of 30 August 1779, Jones sighted three ships on his port bow and gave chase. The next day he captured one of them, the transport Union. Shortly after that, Alliance reappeared with a prize of her own named Betsy. Landais celebrated the reunion by repeating his refusal to obey Jones and by speaking of a duel once both men reached shore. Pallas rejoined the squadron on the night of 1 September and the next day Vengeance captured an Irish brigantine returning from Norway.

On 3 September 1779, the squadron passed between the Orkney and Shetland Islands and then, after sending two of their prizes to Bergen, Noway, turned south to begin the last part of their cruise around the British Isles. Alliance took two more small prizes and Landais, after refusing to confer with Jones on board Bonhomme Richard, left the squadron once again. The weather deteriorated on 4 September and forced the warships away from the dangerous and rocky shores of Scotland. For the next nine days, Bonhomme Richard did not see any ships. On 13 September, Bonhomme Richard caught two ships leaving Scotland carrying coal. A few days later, Bonhomme Richard captured a collier and the sloop Speedwell off the coast of Whitby, England. Jones ordered that all valuables be removed from the ships and ordered the prizes to be scuttled, but one of the French captains released the sloop after obtaining a ransom from the sloop’s captain.

On the night of 21 to 22 September 1779, Bonhomme Richard captured another collier and drove a second ship ashore south of Flamborough Head, Yorkshire, England. Jones also captured a British brigantine inbound from Rotterdam, Holland. Early on the morning of 22 September, the squadron sighted a group of merchant ships, but slight winds prevented Bonhomme Richard from pursuing them. That evening, Jones reversed course and headed back north to Flamborough Head to look for Pallas which had fallen behind while chasing some ships. Shortly before dawn on 23 September 1779, a lookout spotted the return of Alliance and Pallas.

Bonhomme Richard and her consorts moved slowly northward until early afternoon when a stillness fell over the squadron. At roughly 1500 hours on 23 September 1779, a lookout on board Bonhomme Richard shouted down in a bellowing voice to Jones that a large group of ships was approaching from the north. Jones, guided by information obtained from the captains of some of his captured ships, concluded that these vessels belonged to a 41-ship convoy coming from the Baltic under the protection of the British frigate HMS Serapis, commanded by Captain Richard Pearson, Royal Navy, and the sloop-of-war HMS Countess of Scarborough. Eager to go after such big targets, Jones ordered that maximum sail be used to close with the enemy. But the wind was so light that it took three and a half hours before the ships reached striking distance.

At approximately 1830 on 23 September 1779, one of the greatest battles in naval history was about to begin. Bonhomme Richard rounded Serapis’ port quarter and, after an exchange of shouted questions and answers between Jones and Pearson to establish identity, Bonhomme Richard opened fire with a salvo from her starboard broadside guns. Serapis was the superior ship compared to Bonhomme Richard. Serapis was faster, more maneuverable, and carried a far greater number of 18-pounder cannons. Almost immediately after Bonhomme Richard fired, Serapis replied with a devastating broadside of her own. After the first or second broadside from Bonhomme Richard, two of her 18-pounder cannons exploded, killing many men and neutralizing the rest of her largest guns for fear that they too would explode. The explosions also caused substantial damage to Bonhomme Richard. But Bonhomme Richard unleashed two or three more broadsides, attempting to rake the Serapis’ bow and stern.

John Paul Jones was now in trouble. Realizing that he was outgunned by his more powerful and faster opponent, Jones reasoned that his only chance of victory was to move alongside Serapis so that he could board the British ship and have his sharpshooters pick off the British officers and men. Bonhomme Richard neared Serapis and then collided with her in a way that the British warship’s anchor was embedded into the hull of the American vessel, locking the two ships together.

At this point, with some cannons still firing at point blank range and with the crews of the two ships shooting at each other, Captain Pearson shouted over the side to John Paul Jones, “Has your ship struck?” (meaning: are you going to surrender?) John Paul Jones then uttered perhaps the greatest reply in all of naval history, shouting right back, “I have not yet begun to fight!”

John Paul Jones was not about to give up the battle, let alone his ship. With the two ships now locked together in a deadly embrace, Jones shouted, “Well done, my brave lads, we have got her now; throw on board her the grappling irons and stand by for boarding.” For four hours the crews of the two ships fought each other. At one point, the sails of both ships were on fire and the battle had to be suspended while damage control parties on both ships fought the flames. Once that was done, the battle resumed.

With the loss of his 18-pounders, Jones had no cannon left except three 9-pounders on the quarterdeck, one of which he helped pull from the port side with his own hands. Jones’ biggest advantage was the good marksmanship of the French Marine musketeers on deck and the seamen and gunners in the fighting tops. The fighting top was a platform located at the top end of the lower masts on a sailing warship. In battle, this position was manned by Marines or sailors with rifles and muskets. From the fighting tops, these men would fire down on the decks of enemy vessels. Because of their fast and accurate shooting, Serapis had no men alive on deck and her open-deck battery of ten 6-pounders was deserted. But Serapis’ 18-pounders below deck were banging away, blowing huge holes in Bonhomme Richard. It was amazing Bonhomme Richard was still afloat given all of the structural damage she sustained. With the two ships still locked together, the only thing keeping Bonhomme Richard’s sails up were the sails and rigging on board Serapis.

Jones personally directed the fire of one of the 9-pounders on deck, since so many of his crew were either dead or wounded. At one point, Jones was so exhausted that he sat down to rest on a hencoop, when a sailor came up to him and said, “For God’s sake, Captain, strike!” Jones paused and leaped to his feet and said, “No, I will sink, I will never strike!” He then resumed command of the 9-pounder cannon.

Jones’ incredible will, the expert marksmanship of his men in the tops, and his Marines proved to be decisive. They picked off so many British gunners that the British were having trouble manning their cannons. Jones then directed the fire of his last three 9-pounders, loaded with double-headed shot, against the Serapis’ mainmast. After a big explosion, Captain Pearson was almost ready to surrender. He tried his luck one more time, shouting to Jones, “Sir, do you ask for quarter?” And Jones replied, “No, sir, I haven’t as yet thought of it, but I’m determined to make you strike.” Pearson tried to have his men board Bonhomme Richard one last time, but were beaten back again by Jones’ crew.

By 2200, the battle continued to drag on. The situation on board Bonhomme Richard seemed hopeless to almost every officer except the captain. With a sinking ship that was on fire and almost every cannon silenced except three 9-pounders, and with the enemy still firing a good number of their own cannons, Bonhomme Richard’s situation was desperate. But Jones continued to have his few remaining guns fire at the Serapis’ mainmast. Then, at roughly 2230, Serapis’ mainmast began to tremble and Captain Pearson lost his nerve. Seeing the condition of his own ship and his men, Pearson walked over to his own staff and pulled down his flag. At this point, Serapis’ mainmast cracked and fell overboard, carrying with it her mizzen topmast. The battle was finally over.

Some of Bonhomme Richard’s crew boarded Serapis and Captain Pearson was brought on board of what was left of Bonhomme Richard. Pearson was introduced to John Paul Jones and at that point the defeated British captain handed over his sword to Jones, who promptly returned it with a few gracious words about his gallant fight. Jones then invited Pearson below into his wrecked cabin to drink a glass of wine. Such were the ceremonial manners of 18th century naval warfare.

As for the other ships in Jones’ squadron, only Pallas rose to the occasion and attacked HMS Countess of Scarborough. After a battle lasting two hours, Countess of Scarborough also surrendered. The rest of Jones’ squadron decided to take no major part in the battle, much to the anger of Jones. But it still was a huge victory. Between the two British ships, Jones captured 504 prisoners, including 26 officers. Serapis was in terrible condition, with most of her spars and sails and rigging cut away and her dead and dying men lying all over her decks. But the condition of Bonhomme Richard was even worse. Her rudder was barely hanging on to the ship, her stern frames and transoms were almost entirely shot away, the quarterdeck was about to fall into the gunroom, at least five feet of water was in the hold and increasing rapidly, and her topsides were gone. The timbers of her lower deck were blown to pieces and the ship was sinking. Jones and his crew tried to save Bonhomme Richard, but the damage was just too great. Jones transferred his flag and surviving crewmen to Serapis and on 25 September 1779, Bohomme Richard sank beneath the waves. Jones took his prisoners and his ships to the neutral port of Texel, Holland.

Final casualties were heavy by 18th century standards. Bonhomme Richard lost 150 men killed and wounded out of a total of 322. Serapis lost roughly 100 killed and 68 wounded. Although Captain Pearson lost two warships, he had accomplished his mission. The Baltic convoy made it through without a loss. Pearson was eventually acquitted at a court martial and was presented with a magnificent silver vase by the Russia Company out of gratitude for saving the convoy. Pearson was later knighted by King Georg III. Not bad for the man who lost the battle. Actually, Great Britain probably didn’t want to admit that it had lost a major naval battle to an American captain off her own shores.

As for John Paul Jones, in honor of his victory he received a special sword and medal from Louis XVI as well as the title “Chevalier.” Jones accepted the high honor, along with all the other praises and gifts that were bestowed upon him in Louis XVI’s court. In 1787, the Continental Congress resolved that a gold medal be struck in commemoration of Jones’ “Valor and brilliant services” and it was presented to Chevalier John Paul Jones. Unfortunately, he never again was given a major command in the Continental Navy. In 1788, Jones decided to go to Russia where Catherine the Great made him a rear admiral in her navy. He hoped that command of a battle fleet in Russia would qualify him for higher command if and when the United States built a permanent Navy. Although he successfully commanded the Black Sea Squadron in the Dnieper River, court intrigues forced Jones to leave Russia. In 1790, Jones returned to Paris and died almost penniless on 18 July 1792. It was a sad, sad end to a brilliant naval war hero who deserved much better from the United States.

John Paul Jones and Bonhomme Richard’s great victory over Serapis not only proved that the United States could project naval power overseas, but that it could also fight the Royal Navy off its own shores and win. This was a tremendous morale boost not only for the Continental Congress, but also for the people in a collection of colonies trying to become a nation. The Royal Navy, masters of the seas and the most powerful fighting force in the world, could be beaten in their own backyard, and John Paul Jones on board Bonhomme Richard proved that.

Tuesday, February 28, 2012

USS Nashville (CL-43)


Figure 1: USS Nashville (CL-43) in the Hudson River, New York City, in 1939. The Palisade Amusement Park is in the right distance. Courtesy of Donald M. McPherson, 1969. US Naval Historical Center Photograph. Click on photograph for larger image.


Figure 2: USS Nashville (CL-43) off the Mare Island Navy Yard, California, on 1 April 1942. She is wearing Measure 12 (Modified) camouflage. Photograph from the Bureau of Ships Collection in the US National Archives. Click on photograph for larger image.


Figure 3: USS Nashville (CL-43) off the Mare Island Navy Yard, California, on 4 August 1943. Photograph from the Bureau of Ships Collection in the US National Archives. Click on photograph for larger image.


Figure 4: Doolittle Raid on Japan, April 1942. USS Nashville (CL-43) firing her 6-inch main battery guns at a Japanese picket boat encountered by the raid task force, 18 April 1942. Photographed from USS Salt Lake City (CA-25). Official US Navy Photograph, from the collections of the Naval Historical Center. Click on photograph for larger image.


Figure 5: USS Nashville (CL-43) bombarding Kiska Island, Aleutians, on 8 August 1942. US Naval Historical Center Photograph. Click on photograph for larger image.


Figure 6: Leyte invasion, October 1944. General Douglas MacArthur's flagship, USS Nashville (CL-43), anchored off Leyte during the landings, circa 21 October 1944. Nashville wears camouflage Measure 33, Design 21d. Official US Navy Photograph, now in the collections of the National Archives. Click on photograph for larger image.


Figure 7: Leyte invasion, October 1944. General Douglas MacArthur (right, seen in profile) on the bridge of USS Nashville (CL-43), off Leyte during the landings there in late October 1944. Standing in the center (also seen in profile) is Lieutenant General George C. Kenney. Photograph from the Army Signal Corps Collection in the US National Archives. Click on photograph for larger image.


Figure 8: USS Nashville (CL-43) crewmen cleaning up the port side 5-inch gun battery, after the ship was hit in that area by a Kamikaze on 13 December 1944, while en route to the Mindoro invasion. Note fire damage to the guns and nearby structure. Official US Navy Photograph, now in the collections of the National Archives. Click on photograph for larger image.


Figure 9: USS Nashville (CL-43) underway in Puget Sound, Washington, on 25 March 1945. Photograph from the Bureau of Ships Collection in the US National Archives. Click on photograph for larger image.


Named after the capital of the state of Tennessee, the 9,475-ton USS Nashville (CL-43) was a Brooklyn class light cruiser that was built by the New York Shipbuilding Corporation at Camden, New Jersey, and was commissioned on 6 June 1938. The ship was approximately 608 feet long and 61 feet wide, had a top speed of 32 knots, and had a crew of 868 officers and men. As built, Nashville was armed with fifteen 6-inch guns, eight 5-inch guns, and eight .50-caliber machine guns.

After being commissioned, Nashville went on a shakedown cruise in the Caribbean. In early August, the ship steamed to northern Europe for a goodwill visit, arriving at Cherbourg, France, on 24 August 1938. Nashville continued her trip to Portland, England, where 25 million dollars in British gold bullion was placed on board the ship. The cruiser left Portland on 21 September and arrived at the Brooklyn Navy Yard, New York, nine days later. Once there, she unloaded the gold and on 5 October went to the Philadelphia Navy Yard, Philadelphia, Pennsylvania, for an overhaul.

In the spring of 1939, Nashville brought American representatives for the Pan American Defense Conference to Rio de Janiero, Brazil, and then carried them back to Annapolis, Maryland, on 20 June 1939. On 23 June, the cruiser left Norfolk, Virginia, for the Pacific via the Panama Canal, arriving at San Pedro, California, on 16 July. Nashville remained based there for two years. In February 1941, Nashville and three other cruisers brought US Marines to garrison Wake Island. Then on 20 May, she left Pearl Harbor, Hawaii, for the east coast, arriving at Boston, Massachusetts, on 19 June to escort a convoy carrying Marines to Iceland.

From August to December 1941, Nashville was based at Bermuda and escorted “neutrality patrols” in the central Atlantic. After the bombing of Pearl Harbor on 7 December 1941, Nashville steamed to Casco Bay, Maine, where she escorted a troop and cargo convoy to Iceland. She then continued escorting convoys between Bermuda and Iceland until February 1942.

On 4 March 1942, Nashville rendezvoused with the aircraft carrier USS Hornet (CV-8) off the coast of Virginia and escorted the carrier to California via the Panama Canal. The ships arrived at San Diego, California, on 20 March. Hornet and Nashville then left San Diego on 2 April under the command of Admiral William Halsey. What made this trip different was that Hornet was carrying a full load of 16 US Army Air Corps B-25 bombers, under the command of Lieutenant Colonel James Doolittle. On 13 April 1942, Hornet and Nashville rendezvoused with Task Force 16 just north of Midway Island in the Pacific. The big task force set course for Japan.

On 17 April 1942, when the American warships were 1,000 miles from Japan, the small destroyers were detached from the group and told to return to Pearl Harbor. Nashville, along with the other cruisers in the task force, accompanied the carriers Hornet and USS Enterprise (CV-6) on a high-speed run to the launching point for the B-25 bombers. On 18 April, the task force was sighted by a Japanese picket boat, which reported the position of the task force before being sunk by scout planes from Enterprise. A second scout boat then was spotted and sunk by Nashville’s guns. But now the planes had to be launched since the element of surprise was lost. Doolittle’s planes were launched that day 150 miles short of their intended destination and in heavy seas. As soon as all of the bombers were launched, all of the ships in the task force reversed course and headed back to Pearl Harbor. They all returned unharmed to Pearl Harbor on 25 April 1942. The famous “Doolittle Raid” also turned out to be a major success (perhaps not militarily in terms of the number of targets destroyed, but it certainly was a huge morale boost for the American people at a time when all the war news looked pretty grim).

Nashville left Pearl Harbor on 14 May 1942 and became the flagship of Task Force 8, which was given the job of defending Alaska and the Aleutian Islands. Nashville arrived at Dutch Harbor, Alaska, on 26 May and then sailed to Kodiak two days later to join other units of the task force. On 3 and 4 June, Japanese carrier planes struck Dutch Harbor, but Nashville and her task force were unable to make contact with the enemy due to a heavy fog. Major Japanese naval forces were withdrawn from the area after Japan’s huge defeat at Midway, but as the Japanese departed the area they left occupying forces behind on the Aleutian islands of Attu and Kiska. From June to November 1942, Nashville patrolled the north Pacific and participated in the attack on Kiska on 7 August in which heavy damage was inflicted on Japanese shore installations.

On 22 November 1942, Nashville left the Aleutians and returned to Pearl Harbor. The ship was transferred to the south Pacific, where she took part in raids against Japanese bases in the central Solomon Islands. While shelling New Georgia and Kolombangara on the night of 12-13 May 1943, an explosion in one of her gun turrets killed eighteen of her crewmen. Nashville left the Solomon Islands and returned to the United States, going to the Mare Island Naval Shipyard, California, for repairs.

Nashville left Mare Island on 6 August 1943 and returned to Pearl Harbor on 12 August to join a carrier task force for strikes on Marcus and Wake Islands. After those raids were completed, Nashville returned to the south Pacific in October 1943. During the next year, Nashville participated in amphibious landings at Bougainville, New Britain, northern New Guinea, Morotai, and Leyte, providing gunfire support and frequently serving as General Douglas MacArthur’s combat flagship. While en route to the invasion of Mindoro, the Philippines, on 13 December 1944, Nashville was hit by a Japanese kamikaze. The aircraft crashed into her port 5-inch gun mount, with both of the plane’s bombs exploding about ten feet off the deck. Gasoline fires and exploding ammunition made her midships area an inferno, but although 133 men were killed and 190 wounded, her remaining 5-inch guns continued to provide antiaircraft fire. The damaged cruiser limped back to Pearl Harbor and from there went to the Puget Sound Naval Shipyard, Washington, for extensive repairs. Nashville remained in the shipyard from January to March 1945.

Nashville returned to active duty in May 1945 and participated in operations in the East Indies and the South China Sea during the last months of World War II. In mid-September 1945, soon after Japan surrendered, Nashville arrived at Shanghai to support the removal of Japanese forces from China. After leaving the Far East in November 1945, Nashville made two voyages to America’s west coast as part of “Operation Magic Carpet,” helping to bring home US service personnel from the Pacific.

Nashville was ordered to steam to the Atlantic in January 1946, where she was inactivated at the Philadelphia Navy Yard. The ship was decommissioned on 24 June 1946, but remained in reserve until 1950. After being overhauled at the Philadelphia Navy Yard, USS Nashville was sold to Chile on 9 January 1951 and renamed Capitan Prat. The ship was an active unit of the Chilean Navy until 1982. In 1983 the cruiser was renamed once again and became Chacabuco, but was sold for scrapping shortly after that.

Tuesday, February 21, 2012

HMS Cockchafer


Figure 1: HMS Cockchafer at Wanhsien, China, 1926. The Insect class gunboat HMS Cockchafer assists in the rescue of British hostages from two British merchant ships that were taken by a local Chinese warlord in August 1926 on the Yangtze River at Wanhsien. The painting shows Cockchafer as she is shelling Wanhsien with another British gunboat, HMS Widgeon, in the distance. The hostages were rescued by a naval boarding party on board the steamer SS Kiawo, which was used to retrieve the hostages while the gunboats provided covering fire for the actual rescue. All of the British hostages were saved. This painting is from Yangtze River Gunboats, 1900-1949, p. 17, and was published by Osprey Publishing Ltd., 2011. The illustration was done by Tony Bryan and the text in the book was written by Angus Konstam. This book is highly recommended for anyone wanting to learn more about gunboats on the Yangtze River. Click on the photograph for larger image.


Figure 2: HMS Cockchafer underway in the company of HMS Cricket, HMS Glowworm, and HMS Cicala, circa 1939 to1945. Royal Navy photograph courtesy of the Imperial War Museum, London, England. Click on the photograph for larger image.


Figure 3: HMS Cockchafer on the Yangtze River, China, date unknown. Royal Navy Photograph. Click on photograph for larger image.


Figure 4: HMS Cockchafer on the Yangtze River, China, date unknown. Royal Navy Photograph. Click on photograph for larger image.


Named after a large, brown, European beetle, the 645-ton HMS Cockchafer was an Insect class gunboat built in 1915 by Barclay Curle & Company at Glasgow, Scotland. The ship was approximately 237 feet long and 36 feet wide, had a top speed of 14 knots, and had a crew of 53 officers and men. Cockchafer also had a draft of only 4 feet, allowing her to steam in very shallow waters, such as rivers. As built, Cockchafer was armed with two 6-inch guns, two 12-pounder guns, and six machine guns, but this armament varied over the years.

After being commissioned, Cockchafer was based at Brightlingsea and patrolled off the southeast coast of England during World War I. After the war ended, Cockchafer and some of her sister ships were sent to support White Russian (or anti-communist) forces on the Dvina River in northern Russia from 1919 to 1920. On 17 January 1920, Cockchafer, along with four other Insect class gunboats, were ordered to sail to China to be stationed on the Yangtze River. The shallow draft on these gunboats made them ideal ships for patrolling the Yangtze and their primary duty was to protect British lives and property along the river.

China in the 1920’s and 1930’s was wracked by political, military, and criminal turmoil. There were warlords, pirates, corrupt generals, and nationalist troops all preying on civilian shipping on the Yangtze for profit. Most of the time, gunboats from various western nations (as well as Japan) were the only forces available to maintain order on the Yangtze. One of the most notorious incidents where a British gunboat had to step in to rescue British citizens and property involved Cockchafer.

On 29 August 1926, a sampan carrying Chinese soldiers capsized while trying to illegally board the British river steamer SS Wanliu near the city of Wanhsien on the upper Yangtze River. The incident sparked an immediate confrontation between the local warlord, General Yang Sen, and Great Britain. HMS Cockchafer, under the command of Lieutenant Commander L.S. Acheson, happened to be nearby and immediate action was taken. Acheson ordered a boarding party to take back Wanliu, which they did. The British sailors boarded Wanliu, disarmed Yang’s troops, and forced the unarmed troops off the ship. Upon being freed, Wanliu quickly left the area.

Normally, that would have been the end of the matter. But General Yang, who was outraged not only at the loss of Wanliu but also at the way his troops were humiliated in the subsequent rescue, struck back. He seized two British merchant ships, SS Wanhsien and SS Wantung, which were docked off Wanhsien, and took both the ships and their crews’ hostage. Lieutenant Commander Acheson did not have enough sailors to board and take both ships, so he radioed for help. Soon another British gunboat, HMS Widgeon, carrying the British consul from Chungking arrived on the scene. Negotiations between the British consul and General Yang rapidly deteriorated. By 2 September 1926, General Yang brought in roughly 20,000 troops into Wanhsien and they were taking up positions along the shore, directly opposite the two British gunboats. Eleven cannons of various calibers were also brought into the city, one within 50 yards of the shoreline.

On Sunday afternoon of 5 September 1926, Cockchafer drifted near SS Wanhsien and Widgeon moved into position about 150 yards away from SS Wantung. Suddenly, steaming up the river was a merchant steamer, SS Kiawo, and apparently there was a British naval crew on board. The ship had been commandeered by the Royal Navy at Ichang, armed with cannons and machine guns, and manned by seamen from the cruiser HMS Despatch and the gunboats HMS Scarab and Mantis. Commander F.C. Darley was placed in command of both Kiawo and of the whole operation that was about to begin. On board Kiawo there were roughly 110 officers and men facing a Chinese field army on shore.

Kiawo steamed right alongside SS Wanhsien’s starboard quarter and the British sailors jumped over the railings and boarded the merchant ship. But General Yang’s men were waiting for them and opened fire on the British sailors. For almost an hour, both sides fired at each other at point-blank range. During the first few minutes, the British seamen suffered heavy casualties, but then they rallied and the Chinese soldiers began to fall. Commander Darley was last seen with a pistol in each hand, leading the second wave of the boarding party over Wanhsien’s bloody deck, getting off two shots before his body was riddled with bullets. The British sailors continued the fighting as Chinese troops began firing from shore.

By this time, both Cockchafer and Widgeon opened fire on the shoreline and on the city itself. The gunboats were hitting Chinese gun positions and hitting as many troops along the shoreline as possible. There was a hail of gunfire coming from the shore, with one bullet hitting Lieutenant Commander Acheson in the back on board Cockchafer’s bridge. For more than two hours, Acheson lay on the deck directing operations throughout the battle. After almost an hour of fighting, Kiawo cast off from SS Wanhsien, having rescued the British officers from the merchant ship. During the confusion of the battle, the officers from the nearby SS Wantung were able to jump off their ship and swim to Kiawo. With all of the hostages rescued, Cockchafer’s and Widgeon’s firing began in earnest. Since the British could not retrieve the two merchant ships and since they did not want General Yang to keep them, the gunboats shelled them mercilessly. Both of the merchant ships were almost blown to pieces. The gunboats also continued firing on Chinese troop positions both along the waterfront and inside Wanhsien.

Once the battered Kiawo steamed out of range, the gunboats ceased fire. Casualties during the assault were heavy. Of the 110 British officers and men at the start of the attack, 20 percent were casualties. Out of 7 officers, 3 were killed and 2 wounded. Four sailors died and 13 were wounded. Approximately 250 Chinese troops were killed during the attack with another 100 civilians killed in the crossfire between the opposing sides. The quick and accurate shelling from Cockchafer and Widgeon subdued much of the Chinese small arms fire, keeping British casualties a lot lower than they could have been.

The action at Wanhsien turned into a major diplomatic and international incident, with the Chinese claiming that “thousands” of “helpless” Chinese were killed. But the Royal Navy did not back down from the attack, claiming they had every right to protect their citizens and their ships.

Cockchafer remained on the Yangtze until 1939. She was going to be converted into a minelayer, but was instead transferred to the East Indies Squadron. In 1941, Cockchafer participated in the landings of British and Indian Army troops at Basra, Iraq, during the British invasion of that country during World War II. The gunboat was also used to host the regent of Iraq, Amir Abdul Illah, who had to flee Baghdad because of an assassination plot.

Cockchafer also participated in the Anglo-Soviet invasion of Iran, codenamed Operation Countenance, from 25 August to 17 September 1941. The purpose of the invasion was to seize the Iranian oil fields for the Allied war effort.

In 1943, Cockchafer was assigned to the Mediterranean Fleet at Malta. She assisted in supporting Operation Husky, which was the invasion of Sicily. Once the invasion of Italy had taken place, Cockchafer was used for harbor defense duties in Taranto, Italy, in late 1944. In 1945, the gunboat was ordered to steam to the Eastern Fleet in the Indian Ocean and support operations in Burma. After the war with Japan ended in August 1945, Cockchafer was sent to Singapore where she was placed in reserve. In 1949, HMS Cockchafer, a remarkable gunboat that saw service all over the world, was sold for scrap and broken up.

Tuesday, February 14, 2012

CSS Arkansas


Figure 1: CSS Arkansas (1862). Sepia wash drawing by R.G. Skerrett, 1904. Courtesy of the Navy Art Collection, Washington, DC. US Naval Historical Center Photograph. Click on photograph for larger image.


Figure 2: CSS Arkansas (1862). Nineteenth century photograph of a sketch by S. Milliken, CSN. US Naval Historical Center Photograph. Click on photograph for larger image.


Figure 3: CSS Arkansas (1862). Line engraving after a drawing by J.O. Davidson, published in Battles and Leaders of the Civil War, Volume III, page 573, depicting the ship fitting out off Yazoo City, Mississippi, in June-July 1862. Assisting in the work is the CSS Capitol. US Naval Historical Center Photograph. Click on photograph for larger image.


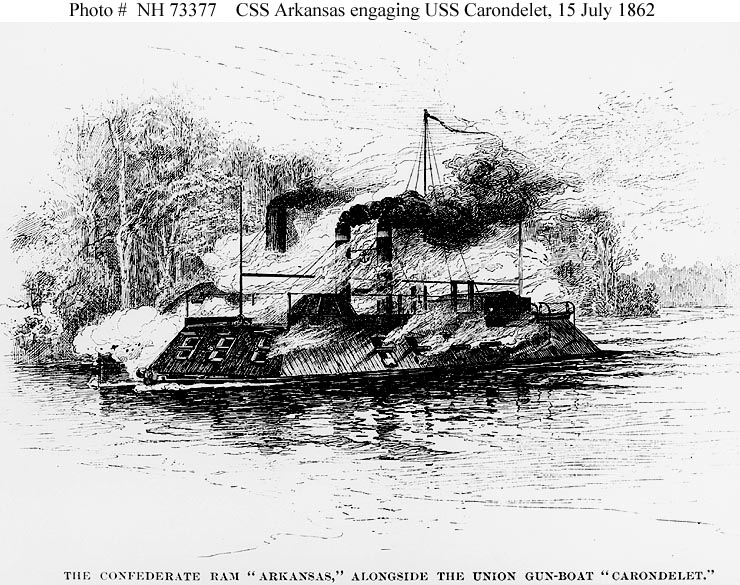
Figure 4: CSS Arkansas engaging USS Carondelet, 15 July 1862. Line engraving published in Battles and Leaders of the Civil War, Volume III, page 574.This action, which took place in the Yazoo River, Mississippi, left Carondelet seriously damaged. US Naval Historical Center Photograph. Click on photograph for larger image.


Figure 5: "Battle between the Carondelet and Arkansas." Engraving published in Rear Admiral Henry Walke's Naval Scenes and Reminiscences of the Civil War in the United States (1877), depicting USS Carondelet in action with CSS Arkansas on the Yazoo River, Mississippi, 15 July 1862. Walke commanded Carondelet at this time. Note that Arkansas is depicted with greatly exaggerated freeboard. US Naval Historical Center Photograph. Click on photograph for larger image.


Figure 6: CSS Arkansas running through the Union fleet above Vicksburg, Mississippi, 15 July 1862. Line engraving after a drawing by J.O. Davidson, published in Battles and Leaders of the Civil War, Volume III, page 556. US Naval Historical Center Photograph. Click on photograph for larger image.


Figure 7: "The Rebel Ram 'Arkansas' Running Through the Union Fleet off Vicksburg." Line engraving published in Harper's Weekly, 1862, depicting the passage of CSS Arkansas through the Federal fleet above Vicksburg, Mississippi, on 15 July 1862. US Naval Historical Center Photograph. Click on photograph for larger image.


Figure 8: "The Union Gun-boat 'Essex' (Commander Porter) Destroying the Rebel Iron-clad Ram 'Arkansas,' in the Mississippi." Line engraving published in Harper's Weekly, 1862. CSS Arkansas was run ashore and burned to prevent capture when her engines failed during this encounter with USS Essex, on 6 August 1862. US Naval Historical Center Photograph. Click on photograph for larger image.


Named after the state of Arkansas, the 800-ton CSS (Confederate States Ship) Arkansas was a twin-screw ironclad ram that was partially built in 1861 by J. T. Shirley at Memphis, Tennessee. The ship was approximately 165 feet long and 35 feet wide, had a top speed of 8 knots, and had a crew of 200 officers and men. Arkansas was armed with two 9-inch smoothbore cannon, two 9-inch 64-pounders, two 9-inch shell guns, two 6-inch rifled cannons, and two 32-pounder smoothbore cannons.

This Confederate warship was still under construction when the Union fleet began to near Memphis in May of 1862. As a precaution, Arkansas was towed up the Yazoo River to Yazoo City, Mississippi, for completion. On 26 May 1862, Lieutenant Isaac Newton Brown, CSN (Confederate States Navy), took command of Arkansas and quickly completed construction of the ship. Boilerplate iron, thick timber, and railway iron were used throughout the ship, making it very difficult for cannon shot to penetrate her sides. Yet despite her size and weight, Arkansas was quite maneuverable and fast for an ironclad ram. As soon as Arkansas was completed, Lieutenant Brown was determined to take the fight to the Union Navy.

On 15 July 1862, Lieutenant Brown took Arkansas boldly down the Yazoo River where he soon encountered three Union warships, the gunboats USS Carondelet and USS Tyler, and the ram USS Queen of the West. Arkansas did not hesitate and quickly attacked the superior force. First, Arkansas neared Carondelet, Commander Henry Walke, USN, in command. Arkansas scored several hits on Carondelet’s unprotected stern, severely disabling the ship and forcing it to run aground to prevent her from sinking. Arkansas then turned her attention to Tyler, which was near the stricken Carondelet. The two ships traded shots, but Arkansas inflicted substantial damage to Tyler, forcing her to retreat with many casualties.

Arkansas then left the Yazoo River and entered the mighty Mississippi River. What met her was a sight to behold. A large array of Union warships lay in front of her, just outside the range of the Confederate batteries at Vicksburg, Mississippi. Lieutenant Brown decided to run the Federal blockade and head for the protection of Vicksburg. Although it looked like suicide, the Confederate warship started steaming past the Union warships. Both sides were shooting at each other and the Union ships scored many hits on Arkansas. But the timber and iron on board the Confederate ram held together and Arkansas steamed right through the Union line, eventually reaching the safety of Vicksburg. Confederate Secretary of the Navy Stephen Mallory said of the event, “Naval history records few deeds of greater heroism or higher professional ability than this achievement of the Arkansas.”

Although Arkansas made it to Vicksburg, she was badly damaged. Some repairs were made, but on 22 July 1862, Arkansas was attacked by the Union warships USS Queen of the West and the ironclad USS Essex. Arkansas was hit again, although not severely damaged in this battle. By this time, Arkansas was in serious need of an overhaul and extensive repairs. But with few Confederate warships available, Arkansas was ordered to steam down the Mississippi and assist Confederate forces in an attack on Baton Rouge, Louisiana. While carrying out this mission on 6 August 1862, CSS Arkansas suffered a severe machinery breakdown during another gun battle with the Union ironclad Essex. Unable to escape, Arkansas drifted ashore and had to be burned to prevent her capture by Union forces.

CSS Arkansas showed that warships built by the Confederate States were tough and heavily armed. But the Confederates did not have the industrial base to either maintain them or build a lot of them. So no matter how good their ships were, they could simply be overwhelmed by the Union Navy’s superior numbers and huge manufacturing capacity. This should be a stern warning to all those individuals who place their faith in “quality” over “quantity.” In the end, you can have the best gunboat in the world, but it will always be overwhelmed by superior numbers.

Tuesday, February 7, 2012

USS Balao (SS-285, AGSS-285)


Figure 1: USS Balao (SS-285) off the Mare Island Navy Yard, California, following overhaul, 25 October 1944. Official US Navy Photograph, from the collections of the Naval Historical Center. Click on photograph for larger image.


Figure 2: USS Balao (SS-285) off the Mare Island Navy Yard, California, following overhaul, 25 October 1944. Official US Navy Photograph, from the collections of the Naval Historical Center. Click on photograph for larger image.


Figure 3: USS Balao (SS-285) off the Mare Island Navy Yard, California, following overhaul, 25 October 1944. Official US Navy Photograph, from the collections of the Naval Historical Center. Click on photograph for larger image.


Figure 4: USS Balao (SS-285) off the Mare Island Navy Yard, California, following overhaul, 25 October 1944. Official US Navy Photograph, from the collections of the Naval Historical Center. Click on photograph for larger image.


Figure 5: USS Balao (SS-285) off the Mare Island Navy Yard, California, following overhaul, 25 October 1944. Official US Navy Photograph, from the collections of the Naval Historical Center. Click on photograph for larger image.


Figure 6: USS Balao (SS-285) returns to a Pacific base following a successful war patrol, circa early 1945. The location is probably Guam. Note USS LCT-1000 in the right distance. Official U.S. Navy Photograph, now in the collections of the National Archives. Click on photograph for larger image.


Figure 7: Vice Admiral Charles A. Lockwood, USN, Commander Submarine Force, Pacific Fleet (center), on board USS Balao (SS-285), welcoming the submarine back to port from a successful war patrol, circa early 1945. Location is probably Guam. Balao's Commanding Officer, Lieutenant Commander Robert K.R. Worthington, is to the right of Vice Admiral Lockwood, facing the camera. Note 4-inch deck gun, with a Japanese flag and six "hash marks" painted on its barrel. Official US Navy Photograph, now in the collections of the National Archives. Click on photograph for larger image.


Figure 8: Submarine crewmen wave their newly delivered mail, as their "boat" returns to port from a successful war patrol, circa early 1945. Location is probably Guam. The returning submarine is probably USS Balao (SS-285). Note USS LCT-1062 in the left distance, and .30-caliber and .50-caliber machine guns mounted at the submarine's deck edge. Official US Navy Photograph, now in the collections of the National Archives. Click on photograph for larger image.


Figure 9: USS Balao (SS-285) photographed circa 1952. Courtesy of Donald M. McPherson, 1974. US Naval Historical Center Photograph. Click on photograph for larger image.


Figure 10: USS Balao (AGSS-285) exercising with a Brazilian S2F anti-submarine airplane and H-34 (HSS-1) helicopter off Key West, Florida, 7 March 1961. The Brazilian helicopter is flying over the submarine in this view. Balao is a unit of Submarine Squadron Twelve, whose insignia is visible on her fairwater, directly over her hull number. Official US Navy Photograph, from the collections of the Naval Historical Center. Click on photograph for larger image.


Figure 11: USS Balao (SS-285). View of USS Balao's "sail,” with Submarine Squadron Twelve insignia, circa 1963. Removed shortly before Balao was expended as a target in 1963, this structure has been on exhibit at the Washington Navy Yard, Washington, DC, since about the middle 1960s. US Naval Historical Center Photograph. Click on photograph for larger image.


Figure 12: Washington Navy Yard, Washington, DC. Main entrance to the Navy Memorial Museum, circa summer 1978. This entranceway, located between the building's two southern wings, was demolished and rebuilt to another design in 1981-1982. Note the three submarine periscopes located in the museum's southwestern wing, and the old anchor mounted in front of that wing. Large metal plaque above the "Navy Memorial Museum" sign identifies the building's previous use, as the Naval Gun Factory's Breech Mechanism Shop. At right is the conning tower fairwater ("sail") of USS Balao (SS-285), which was relocated to another part of the Navy Yard in 1982 and again in 2001. This photograph was received by the Naval Photographic Center in January 1979. Official US Navy Photograph. Click on photograph for larger image.


Named after a small, slender fish, USS Balao (SS-285) was the lead ship in a large class of American submarines built during World War II. Balao weighed in at 1,526 tons on the surface and 2,414 tons submerged. She was approximately 311 feet long and 27 feet wide, had a top speed of 20 knots on the surface and 8.75 knots submerged, and had a crew of 66 officers and men. Balao was armed with ten 21-inch torpedo tubes, one 4-inch and one 40-mm deck gun, and two .50-caliber machine guns. Balao was built at the Portsmouth Navy Yard at Kittery, Maine, and was commissioned on 4 February 1943.

After undergoing her shakedown cruise off the coast of New London, Connecticut, Balao was sent to the Pacific to begin her war against the Japanese. Balao’s first three war patrols originated from Brisbane, Australia, and took place between July 1943 and January 1944. She scoured the area between the Caroline and Bismarck Islands, but was not able to sink any ships, although an attack on a Japanese convoy on 23 October 1943 resulted in a wartime credit for one ship that was not confirmed in post-war review.

Balao left Brisbane for her fourth patrol in February 1944. This time, though, the submarine had much better luck. Balao was patrolling the area north of New Guinea on 23 February when she spotted a small convoy of two enemy freighters and one small escort. Balao fired six torpedoes at the larger of the two freighters, scoring three hits. The small escort steamed towards the submarine, but Balao left before an attack could take place. Balao later returned to the area where the ship went down and found one Japanese survivor and took him on board. The survivor told the Americans that they had sunk the 5,857-ton passenger cargo ship Nikki Maru and that she had sunk rapidly after being hit. A few days later, shortly after midnight on 28 February, Balao crept up on some more Japanese ships and sank the 2,723-ton freighter Shoho Maru and the 6,803-ton passenger cargo ship Akiuro Maru.

Balao made two more war patrols (her fifth and sixth), this time while based at Pearl Harbor, Hawaii, from April to early August 1944. She sank an armed trawler and rescued several downed US pilots off the Palau Islands. After that, Balao was sent back to the United States and on 20 August arrived at the Mare Island Navy Yard, California, for a major overhaul. Once the overhaul was completed, Balao returned to Pearl Harbor and arrived there on 15 November.

Balao left Pearl Harbor on 4 December 1944 on her seventh war patrol and rendezvoused with two other American submarines, USS Spot (SS-413) and USS Icefish (SS-367). Together these three ships formed a small “wolfpack” and made their way to the Yellow Sea between China and Korea. Up until 2 January 1945, the only things the submarines spotted were fishing boats and floating mines. But on that day Balao sighted the masts of a sailing vessel. It was a three-masted schooner and Balao surfaced to attack. Balao fired three torpedoes, two of which missed, but the third hit the schooner squarely amidships and the ship sank immediately. On that same day, Balao located a larger ship on her radar and successfully crept up on her. Early the next morning, Balao got in close to the ship and fired six torpedoes. Three of them hit the target, but the ship, which looked like a tanker, refused to sink. As the tanker sat dead in the water and helpless, Balao circled like a wolf coming in for the kill. Balao fired seven more torpedoes at the tanker and scored three more hits, but, incredibly, the ship refused to go down. Finally, Balao came in close to the ship and fired three more torpedoes, scoring one more hit. This appeared to be the final blow and the ship went down after that. Although the Balao’s captain thought he had “bagged” a tanker, post-war records show that it was, in fact, the 5,244-ton freighter Daigo Maru. Balao patrolled independently after that and on 19 January 1945 she arrived at Apra Harbor, Guam, for some repairs alongside the submarine tender USS Apollo (AS-25).

Balao began her eighth war patrol on 27 February 1945 by joining three other American submarines and heading for the East China and Yellow Seas. On 18 March, Balao located a 188-ton trawler and sank it with gunfire. The next morning, Balao attacked a convoy of four Japanese transports that were guarded by four escorts. Balao fired 10 torpedoes at three of the targets. The men on board Balao heard four of their torpedoes hit and they later received credit for sinking the large 10,413-ton transport Hakozaki Maru. Later that same afternoon, Balao surfaced to attack a group of small trawlers. The submarine sank one trawler with gunfire and left the three others burning. On 26 March, Balao sank the 880-ton cargo ship Shinto Maru No. 1 using gunfire and then returned to Guam for fuel, provisions, and torpedoes.

Balao’s two final combat cruises, from May to August 1945, produced no major results for the submarine, but she did manage to save several American pilots who were forced down over the ocean. Balao was sent back to the US east coast at the end of August 1945, shortly after the war with Japan ended. She was decommissioned a year later and joined the Atlantic Reserve Fleet.

Balao was re-commissioned on 4 March 1952 at the US Naval Submarine Base at New London, Connecticut. After her shakedown training, Balao was sent to Key West, Florida. There she served primarily as a training ship for antisubmarine and Special Development Forces in the Key West and Guantanamo Bay operating areas. For the next ten years, she served as a target in training exercises for anti-submarine forces and regularly visited ports around the southern United States. Balao made a South American cruise from January to March 1957 and participated in exercises with local navies. Then in 1959, USS Balao played a “starring role” in the movie “Operation Petticoat,” with Cary Grant and Tony Curtis. Balao was the famous “pink submarine” in that motion picture and became a celebrity within the fleet, at least for a little while.

Balao was re-classified AGSS-285 in April 1960 and continued participating in training exercises for the next three years. She deployed to the Mediterranean in mid-1962 and served at sea in the western Atlantic during the Cuban Missile Crisis later that year. USS Balao was decommissioned on 1 August 1963 and her name was struck from the Navy list that same day. Her hulk was sunk off the coast of northern Florida on 6 September as a target. However, before she was sunk, Balao’s conning tower fairwater (which is the superstructure that surrounds and conceals the conning tower, also known as the “sail”) was removed from the ship. It was preserved and has been on exhibit at the Washington Navy Yard in Washington, DC, since the mid-1960s. USS Balao received nine battle stars for her service during World War II, but no Oscar nominations for her role in the movie “Operation Petticoat.”